
Better pictures when the weather actually improves here . . . . NOT taking it out in the rain . . . not that that would improve anything probably . . . . . . . .
It's not "finished" . . . . by quite a bit . . . . . crappy plastic nut from . . . Amazon possibly . . . action . . . the bridge is screwed down almost to the deck and it may still be a bit high (may need one of those nice StewMac shims) . . . intonation, well the saddles are not line up straight, and more or less where you'd expect them to be . . . . but that's just from a rough check I did way back when I first put the neck on . . . wiring . . . hmm, it's not quite wired like the circuit, no treble bleed yet, and there is an 0.033 µF orange drop tone cap hard wired . . . on the wrong end of the pot . . . the tone and volume pot work in opposite directions . . . . OOOPSSS
. . . . so what IS there
• // P90, serial, parallel, rail // wiring for the two P rails in the top bout for each pup
• rotary switch for // bridge, serial, parallel, neck // pup selection and the phase switch in the lower bout . . . thought about a 5 position 2 deck 4 pole rotary to put it all on the same switch but I'm not sure I could remember where all the options were . . .
• volume - no treble bleed as yet . . .
• tone (with the aforementioned 0.033 µF cap hardwired . . . I THOUGHT - we all know about that right - that I had a 0.022 µF somewhere BUT the lowest I could find was a 0.033 µF . . . 2 X 0.047 µF, 2 X 0.068 µF and a number of assorted caps higher in the range but NO 0.022). I did find 10 or so 0.2 µF caps . . . NO idea why I have those . . . )
• and a on/off/on SPDT switch (in the very back) that switches the tone pot from the standard Fender configuration / modern Les Paul (i.e. tone before the volume), to the 50s Les Paul configuration (i.e. tone after the volume)
 |
| The black dots are NOT connections to the back of the Vol pots . . . yes, I threw me first too . . . From: Harmony Central by BG76 
The top is the standard for a tele, the bottom is the grease bucket mod.
From: Squier-talk by Pictoratus
|
So here are some photos from the 'work' . . . . .


I got annoyed with all the ground wires - never mind the possibility of wiring an unintentional 8) ground loop - so I decided to 'waste' some of my copper foil for grounding, this is just after reassembling the harness on the guard so it's not tied in yet . . . nor was the tone installed . . .

Still not tied in, but the tone has been installed with the on/off/on switch . . . I thought it now would be simple mater resoldering all superfluous ground wires to the copper . . . but . . . well see below . . . stupidity intervened . . .

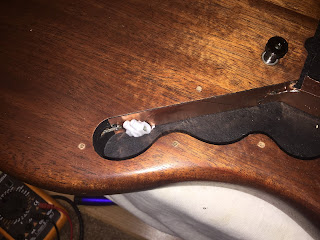
And you would think that that large piece of foil between the pickup cavities (sorry the angle is wrong but trust me, it's at surface level) would be plenty for a connection with the guard . . . right . . . . . . . . . RIGHT ... ... ... ... ... ... ... WRONG, without a screw in that area . . . well a bit of pressure does the trick but that would make playing a bit hard, so now there is an interconnect at the screw over the cavity below the bridge . . . . works like a charm now . . . . and what's that white 'thingy' at the back in cavity . . . take a closer look . . .

So here is the lead to the plugin . . . the mantel is soldered to the copper shielding/ground - you can just about see the soldered lead to the bridge thimble at the extreme right. The white thing is a double screw connection, it's rather large and may not fit in some crowded confines but a JM has - mostly - loads of space so why not make life simple when I know I'm going to futz with different pick guards . . .

Ready for the ground rewiring and testing . . . see if you can spot what I first forgot about . . . switching on the amp resulted in incessant extreme hum . . . any guesses . . . no . . . you can see the solution on the pick guard at the right edge between the pickups . . . yea . . . ground . . . REALLY . . . forgot about that, it's been a while . . . so I was ready to unsolder all kinds of things . . . and had in some instances . . . it was a BEAR to get some of them back . . . . . . . . . . . found one wiring mistake in the connection of the neck pup to the switches . . . and that was it - well after I had diagnosed the grounding problem - despite the fact that the multimeter says that the P90 side (or the rail) side of the pup is out of the loop ticking the pole(s) with a plastic covered paperclip (MUCH easier the handle than the old screwdriver and still plenty of signal) still results in an audible - if MUCH attenuated - signal . . . not sure if there is a 'sneak' circuit somewhere . . . if so I can't find it and the multimeter says NO ... but that may just be because I'm not measuring in quite the right place ... BUT I EVEN get that answer when measuring the output direct ... ... ... ... or if this is just something the p-rails (and possibly other humbuckers) do because of the shared magnet (and close proximity of the coils) or ... or ... or ...
. . . or maybe it's just peculiar to this wiring situation . . . . . . .
Anyway an hour (or two) later and quite a bit of frustration with the crummy soldering iron tip gets us . . . here . . . with a new set of super slinkies . . . not my favorite but I got them cheap . . . and I figure I'll go through a couple of sets while dealing with the next stage

The pick guard is in place and the neck is back on (check that the right screws are in the right holes . . . contoured heel . . . wouldn't want to put the long crew in the short hole and go through the fret board). One drawback of the current config with the 22 fret overhang . . . can't take off the pick guard without taking off the neck or the bridge . . . with the locking tuners it can be done without ditching a set of strings but it's a bit of a bore loosening the stings, screwing out the bridge . . . Oh well, it'll stay like this for a while ... while I figure out the rest of the electronics . . . . . The other iffy thing is that the pickups are 85 mm side to side at the height adjustment pads and the rout is . . . 85 mm side to side best as I can determine, the neck pickup didn't want to go down past a certain, rather high, point . . . first though some of the wires had caught beneath it, there ARE rather a lot in that area. But no, in the end I think it got caught on the edge of the rout as a little persuasion managed to clear the problem without anything else going obviously pear shaped . . . an 85 mm peg in an 85 mm hole doesn't have a lot of clearance . . . .
Oh and Radioshack has 3/16 replacement tips . . . you may want to shorten them a bit for use in a Weller soldering iron but a Dremel and a cutoff wheel . . . and a grinding stone . . . did the job just fine - but remember they are HOT after that . . . yeah forgot . . . stupidity and all . . . And came away with some 0.022 and 0.010 µF caps (green poly metal film, no orange drops, but buying just 2 orange drops at mouser or digikey and paying the postage . . . yeah) so one of those can go in . . . . as soon as I find a 1000 pF for the Treble bleed . . . trying to limit the times disassembling the new baby . . .
No comments:
Post a Comment