Thursday, December 24, 2015

Update

Yep . . . it's been 2 months since the last one.

Real life still getting in the way.

Nope . . . nothing really new to mention . . . except that the house is finally reaching a stage that I can put in a new work table so I can get back to the guitar project again (as well as some other things that have been left hanging ... or got hung up ... in the last 2 months. In the mean time I've been playing it without the electr(on)ics and with the (crappy plastic) pretty much unadjusted nut I put in to get it stringed . . . . it actually already plays pretty darn well . . .

Here it is in it's current state next to it's sister.

Saturday, October 24, 2015

Picking at the guard

Well the list below is moving along so I had some time to work on the guitar.

Still working on the pickguard ... some progress. Made a number of proposals from stiff cardboard to start with and then ... transferred to a piece of 1/4" poplar hobby board for testing. Turns out 1/4" is slightly more than the gap so it'll need to be sanded down some ... about 1/16th later ... not bad for the first try

 ... the bridge end needs some work.

Monday, September 7, 2015

More of that thing . . . . . real life that is . . . . . and it keeps on interfering . . . . . . . . . . .

Sorry for the lack of updates . . . I haven't forgotten but my todo list looks something like this:

- Finish garage room
    = make school table
    = build beam for hanging chairs
    = build wall
    = build work table
    = build bench

- Finish kitchen island for friend . . . . . at this point it's pretty much down to the top

- Finish living room
    = build plinth for cube book cabinet
    = make new guitar hangers w/ led lighting
    = . . . .  .

- Finish sons room
    = fix cabinets to wall
    = design & build bed
    = put french door is closet
    = finish base boards

- Finish daughters room
    = design & build bed
    = put french door is closet
    = finish base boards

- ....
- ....
- ....

- Finish guitar
    = laminate wood
    = cut lower pick guard
    = mount pickups
    = wire electronics
    = get nut cut
    = set up guitar

As you can see work on the guitar will be catch as catch can at least until the first two items are pretty much done . . . . . then I can steal an hour here and there to get back to it . . . .

Friday, August 14, 2015

More of that thing . . . . . real life that is . . . . .

Ok so the OTHER project I was talking about was the rehab of our 'garage room', which means that until I get a new work area set up . . . . I won't be able to get 'anything' done . . . .

Which won't be until after:
          • the walls are painted (by coincidence the same color as the outside of the house - we only noticed once we entered the paint color into the 'house records' and went ... wait we just saw that) . . . we're about 70% done on that one.
          • some book cases have been moved . . . about done 60% on that.
          • the living room - were the book cases came from - has been moved around . . . and a new (larger, what else) hanger backer for the guitars has to be put in . . .
          • the new project table has been set up in the garage room (maybe some posts on that later)
          • a sitting bench is made (may post that here as well)
          • the current fan is replaced . . . by a 'non fan' light fixture
          • a beam is put in to hang a couple of hanging chairs

Yep the wife has some HONEY DO things to do before I can get back to our regularly scheduled programming.

Monday, August 10, 2015

All strung . . . . . . . out . . . . . . up . . .

Well I did have a 'free' morning this weekend so I decided to see how things fit together . . . here is the result next to it's relative . . . . .
For now it's hanging up to get the neck set before I start monkeying around with things. The HAMP locking tumers from Gotoh are nice but I'm not sold on the 'no string trees are needed' part of the advertising . . . the high E string has this annoying 'ring through' . . . then again the el cheapo plastic bridge (uhm . . . it's a NUT the BRIDGE is the OTHER end of the strings dummy . . . ) that's on it right now is almost certainly at least part of the problem . . .

The action is still pretty high but the bridge can still be lowered some ... and ... of course the neck hasn't 'set' yet ... and ... the truss rod hasn't been adjusted .... and ... that el cheapo nut is still 1 mm higher than it should be ... and . . . . . . I foresee some more work in the future.

On the plus side, it does play quite well already on the higher frets and I like the feel of the neck . . . a LOT.

Wednesday, July 29, 2015

Posts

Real life keeps interfering but I did manage to set the inserts for the bridge into the body.

Here are the intended players in today's drama.

The holes supplied were not deep enough so these needed to be drilled out . . . . AND . . . . of course the flat point drill bit my dad brought over has a shank the same size as the bit = 11 mm . . . . which is ... JUST ... big enough not to fit into the 3/8 collet (I think that's what it's called) on my drill . . . . . SO that was a NO GO. 

The boxy thing has 2 11 mm holes lined up dead vertical to help keep the drill bit aligned in lieu of a drill press . . . which I don't have . . . basically a couple of scrap pieces of 3/4" white wood for the sides and 2 1/2" pieces for the top and bottom screwed together. The blue tape is on the bottom over the crew heads to prevent scratches. The metal ring is a depth stop . . . to prevent drilling THROUGH the body should the bit grab.

OK so the flat point bit doesn't work (it WILL NOT fit the chuck of the drill FAIL . . . ) . . . back to the brad point, after verifying that I have enough depth for that little brad point to not go through . . . 

Check depth needed . . . and against the body (sorry no pic) . . . and I did make a couple of pictures of actually setting the inserts BUT . . . they are all out of focus . . . darn.

So here is the finished product . . . . one step closer to a playable instrument . . . . 

Wednesday, June 24, 2015

REAL Life

My apologies for the darth of updates. Real life - or at least what passes as such in the weekends - keeps interfering and that will continue at least through this weekend . . . flying kites at the beach seems much more attractive than sweltering at home in potentially record temperatures.

There will also be some updates on another project besides the guitar . . . . soon.

Saturday, June 6, 2015

picking a guard ....

So here is the current idea .... not much progress .... real life intruding ...
The top piece of Padauk may be replaced by Wenge ..... still have to make a jig to glue this up.

Monday, May 25, 2015

Screwed

So as seen in previous posts the body has a contoured heel ... but the neck screws are all the same length, and when you put them in THIS happens:
As you can see the left rear screw protrudes the required 5/8" ... the others ... more. The right front screw is too long by 5/16" ... get out the hacksaw ... well after trying to use the jigsaw with a metal cutting blade ... not sure what was going on but that didn't make much of an impression on the screw I tried it on.
I drilled some holes in a scrap piece of 1/4" ... something ... and screwed in the screws till the protuded just about a much as needed to be cut ...
And then proceeded with elbow grease and the hacksaw - INITIAL measurements can be seen on the wood, turned out that was to little and two of the screws made another trip through - REMEMBER on custom thingies like these (they are Gotoh cosmo black to match the neck plate) measure twice - at least -, cut once; AND cutting long and you can shorten later, cutting short and ... well ... $&#*((#@ sums it up I think ... ... the metal cutting blade in the jigsaw barely made an impression but the hacksaw blade was made of somewhat sterner stuff ... although one end still got chipped ... Note To Self: get a new blade ...
That looks more like it, I don't know if it matters but the tops of the cut screws were deburred using a bastard file and now the are all 5/8" over the neck pocket.All the cut screws went in very smoothly, it was the screw that wasn't cut down that squealed and squeaked ... go figure ...

And here is the result ....
Now we need something to go into and cover those holes ... ... ... working on it ... ... ...
Still have to figure how that will go together but I found that I need about 6" of width and it doesn't matter if its straight back to front or at an angle .... need to check the required length in both cases though ... and where the screws would end up ...

Saturday, May 23, 2015

Pick the pickguard

Okay so I had some time on my hands as the wife and kids did other activities ... so I went down to the 'local' wood working store (which incidentally had a 25% off on wood sale) and picked up some pieces for the pickguard. Here are some photos ....
Padauk, Wenge & Yellow heart .... oh the possible combinations. At this time the top photo is also the top contender ... mirrored over the red Padauk so with another yellowheart stripe & then the Wenge again ... not sure if that's wide enough though ... may have to use a 1/2" stripe instead of 1/4" or put another stripe on the outside. I'm pretty sure I wont use the full width of the Yellow heart as in the bottom pic ... or alternating Wenge & Padauk as in the middle ... 

Sunday, May 17, 2015

The body . . . part 3 of ...

Well the finish of the body is finished, here is a picture with the neck ... which fits quite snugly BTW, I may need to do a little work with some 400 grit sandpaper if it's not quite straight as it will NOT move as it is now ... fortunately a quick check with a straight edge seems to indicate that it is ... ... ... or at least very very close to
And here is a picture of just the body with the first attempt at a pick guard ... at least the part covering the pickup cavities will be wood ... and quite possibly the whole top part ... the bottom most likely will be black/red/black 3 ply.
Next the bridge post holes need to be drilled out (they need to be 5mm deeper and just a hair wider to accommodate the inserts) and the neck mounting screws need to be shortened ... ... ... I bought some clear optiplex from Lowes to get a better read on the eventual form of the pick guard once that's cut to (more or less) shape I can start assembling the electronics ...

Friday, May 8, 2015

More from the cat

Must have been feeding him the GOOD stuff lately ....
(sorry for the blurry pic . . . only noticed later)


Sunday, May 3, 2015

The body . . . part 2 of . . .

First rule of wood finishing; All finishing takes at least twice as long as you planned for.
Collary; There is at least twice as much sanding involved as you think.

So after the last update, the body was sanded lightly with 220, sanded with 320, lightly stained (stain wiped on and almost immediately wiped off) ... in 3 stages, front, back, sides ... and let dry for 24 hr. Then sanded with 320, buffed with non woven white finishing pad, and lightly stained again.

AND ... I discovered another rather nasty scratch on the lower horn. The nice part about this finish is that you can sand out the scratch (see below) and touch up the stain and you'll never see it after it's finished. Try that with a spray on finish ... possible but MUCH harder to get 'right'.
The horn after sanding out the scratch ... no that's not reflection ...
So here it is after restaining drying, sanding, 2nd stain, sanding & buffing ...
And after the restraining ... still just a hair lighter but you have to
know that it's a refinish and not something that just is a bit lighter.
And here it is in better light ... although next time I'll have to watch the shadows ... just after the last stain. It'll get one more buff in 48hr or so and then it'll be ready for it's osmo oil topcoat.

And no it won't be ABSOLUTELY perfect but even with my OCD tendencies good enough.

Pickups; I broke down and bought a pair of Seymore Duncan p-rails for it (ultimate versitility?? we'll see ...) - they won out over some Sentell mini humbuckers ... BTW I don't like the covers on the S D ones, those S's are a bit much ... , the Sentells may go into something like a future jaguar type build or I may replace the p-rails to see what happens or ... ... ... isn't indecision great. Some copper tape for shielding is also on the way ... now I just have to figure the rest of the wireing. And how to do that raised center to the bridge thing I've been thinking about ... nope I'm not done yet ... 

And yes I still have to clean up the rest of the mess on my work table, such as it is ... fixing the fence this morning had a much higher priority ... not having to chase the dog down through the neighborhood ... ... ... priceless.

Wednesday, April 29, 2015

The body . . . part 1 of . . .

Well with the last test it's time to do something for real . . . I can test till the crows come home but that won't get me a finished guitar . . .

Step 1, light stain to bring out any remaining scratches . . . and sand down with 220 / 320 to remove those.
Bare wood . . . 
Applied the red mahogany minwax  oil stain with a piece of 'utility rag' from Lowes
And lightly stained . . . 
Well it'll be pretty once done . . . but there are as expected some scratches, quite a few light ones on the upper horn and some in the lower cutout round over and then at the lower back . . . 

Sanded these about an hour after the last picture was taken . . . and royally clogged the sandpaper . . . and evened out the stain after with a rag with some turpentine. Surprisingly the back was - as far as I could see - clean . . . no scratches. I'll let it all dry for 48 hr or so and then go over it again, lightly with some 220 and then some 320 to smooth everything down all the way . . . maybe another light application of stain and we (well I; I don't really expect anyone to come over and 'help') can put some finish on . . . 

Thinking of doing a 'raised center' - a la a firebird using some leopard wood I've found at Rockler, need to see that in person first though . . . 
Leopard wood
Or maybe something else? . . . Mahogany $11 . . . Purple Heart $20, Padauk $13, Wenge $15 . . . hmm may be a 'problem' finishing that . . . Bolivian Rosewood (Pau Ferro) $16, Zebra Wood $15, Bubinga $12 . . . might look good . . . Jobillo $12 . . . but only 3" wide so I need 2 pieces possibly . . . striking though . . . 

The raised center will also reduce the - somewhat 'ugly' - 22 fret overhang at the end of the neck . . . there is a 1/4 gap there between the body and the fretboard there . . . 


Saturday, April 25, 2015

More ..... testing

The previous photos of the test strip for the stain turned out to red so here are some better ones:

At the top the red mahogany stain, at the bottom (from the end) 2 x Cabernet, 1 x Cabernet and Cabernet after red mahogany .... the pinkish tones are now visible in the 2 x Cabernet part ... not as pronounced as last week right after the staining but they are still there.

Friday, April 24, 2015

More Switches

Ok, so the last circuit had the 'hanging coil B' problem and a 3P4T switch that turns out to be kinda hard to find . . . Digikey  has one with a true common terminal configuration BUT it's a through hole PCB mount and not a panel mount solder lug style . . . possible but . . .

So here is the revised circuit using a 3P4T rotary which is common and easy to obtain . . . AND . . . it solves the 'hanging coil B when coil A is selected' problem, which in turn implies that the same is possible with some work for the 3P3T / 3P4T slide switches configuration.

May use this in the guitar . . . . 

Thursday, April 23, 2015

A gift . . . . because I was bored

Well I wondered if it was possible to use one switch for coil selection and a second for the combination . . . . turns out is is possible with 2 3 pole switches, one 3 pole 3 throw for coil selection (A, both, B) and one 3 pole 4 throw for selecting the combination (serial, parallel, serial out of phase, parallel out of phase).

I haven't tested this but the connections 'work' I believe:

The only 'mistake' I have to solve is the fact that coil B hangs loose (is not grounded) when coil A is selected. The only 'fix I've found is to use a 4 pole 3 throw switch there instead and use that 4th pole solely to connect B to ground in the UP position.

Saturday, April 18, 2015

Testing . . . testing . . . testing . . .

I knew I will stain the body before putting on a finish and some of the photos already show a test strip of mahogany.

So I've tried 3 wood stains (so far):
- Minwax, Red Mahogany
- Minwax, Red oak
- Rustoleum, Cabernet
Yes the object was to bring the red out in the Mahogany of the body.

I started with the Minwax stains. The red oak was discarded after the first tests . . . and I didn't bother to take a picture (sorry) . . . I really don't know why it's called RED oak, the color on the mahogany was brown with some 'grey' tones, not much red there, maybe it shows different when it's actually on oak or maybe pine . . . haven't tried that yet . . . hmmmmm, I've got some pine laying around somewhere I think . . .

Here is the red mahogany on a piece of mahogany next to the finished headstock, I agree it's not the best lighting for the picture, but this has the same brown as the 'red oak' but none of the grey.


Below is the same piece with some unstained mahogany showing on both sides of the test stain next to the neck. This was finished with the OSMO oil.

So I thought that I wanted some more red which is why I got a can of the Rustoleum Cabernet.

Which turned out to be interesting . . . if not exactly what I was after . . .
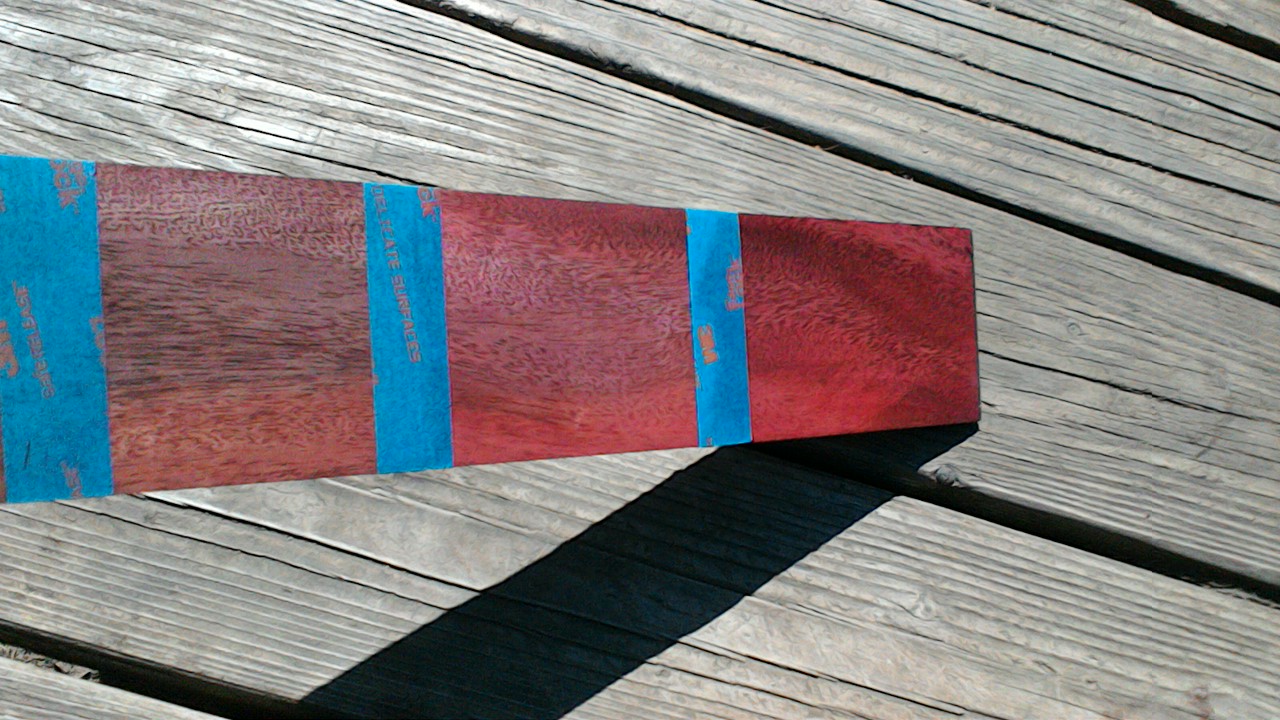
Here are two pictures of the cabernet color test, the end has 2 'coats' the next section 1 'coat' and the third from the end was fist stained with the red mahogany and then with the cabernet. The final section in the right photo has a single 'coat' of the red mahogany. Now these seem to show a bit redder than the actual color and not quite what I was after . . . in the right picture in 'real' life some of the tones are 'purple' rather than red especially in the section with a single 'coat' but they are definitively still there after 2 'coats' . . . however . . . they ONLY show pink/purple under certain angles and lighting conditions, not what I'm after but very interesting never the less . . . I don't know if the same would happen on a piece that was grain filled prior to staining as it would have much less (if any) surface texture (I'm NOT going to fill the grain on the body as I like the 3D effect of different 'colors' / 'tones' when turning the piece) but it would make for an interesting conversation piece . . . . . .

Here is the red mahogany end of the test strip under similar lighting conditions as the cabernet. Again it shows a bit more red / orange than my eyes saw it an hour or so ago.

So at this point I'm 'stuck' with the red mahogany stain as the best option. There is a cayenne stain in ??? - sorry can't remember the brand - but this is a stain / poly wipe-on single step finish and at this point I think I want to go with the OSMO oil for the body as well . . .  maybe I can use some red dye on the body prior to the minwax red mahogany . . . . still debating that one and it WOULD add one more thing to screw up, doing a test strip IS slightly different from doing a whole body after all.

Something to sit on . . . . # II

I put up some pictures of the finished product as promised.

Thursday, April 16, 2015

Something to sit on . . . .

I put up a 'dummy' page for the benches (it's under the ALL THINGS on the right side), the basic plan is there and I'll add some photo's of the finished product soon ... and to which I will be adding some photographs illustrating the building of one (or more . . . the wife wants more . . . ) as soon as I get to them . . . the girls need a bed so that may happen first . . . IF . . . they manage to clean up their room so I can work on it . . .

Tuesday, April 14, 2015

If the jack doesn't fit

Well the jack plate didn't fit quite as it should as illustrated in the previous post . . . and . . . just putting it on the side didn't feel right in the end so I decided to recess it in one direction . . .

So on the left is the process in progress, the blue part above the sand 'paper' wrapped jack plate is multiple layers of painters tape to provide a guide. The sandpaper (starting with 80 and going to 320 grit) was wrapped around the jack plate so everything would end up nice and tight.

On the right is close to the finished product, the sharp edges at the left and right side left by the sanding are already rounded over using some 320 grit sandpaper.

So here is the final product . . . . I unfortunately DID put some scratches on the jackplate . . . nothing that some use wouldn't have done but . . . . next time I'll put some painterstape over the outside face before starting . . . impatience is the bane of my existence . . . . after ?? years I really should come to grips with it . . .
The sand 'paper' in the first picture is the flexiple 'plasticky' kind from Lowes . . . very nice to use around sharp corners . . .

A note about sanding: a nylon bristle brush is nice to clean out the dust from the sandpaper to keep it nice and fresh & effective, something borrowed from the copper/bronze brush used to clean out the filings from a rasp or file.

Wednesday, April 8, 2015

The jack . . . . . .

So with the neck 'finished' it's the body's turn . . . .

First 'issue': the jack plate.

From the specs on the Gotoh site I believed - we all know about that, right - that the jack plate I ordered was flat . . .

Uhm . . . that doesn't look flat to me . . . and . . .  that's of course not quite the curve of the body at the jack hole AND there is also this
It doesn't show well in ANY of the photographs I've taken - and I did try - but, it's just a BIT wider than the flat area between the body roundovers . . . can someone please tell me the technical term, I should know but the brain . . . not surprising as it's probably meant for a Tele which has the same body thickness but doesn't have the roundovers . . . 
I knew about the width, so why not use a smaller plate, well there is this 7/8" hole that needs to be covered and the next smaller size plate was 15/16" wide, I wasn't going to trust manufacturing tolerances quite THAT much (also it was football shaped which I don't particularly like). Oh and why not bend the plate to conform to the curve . . . 1. I'm going to need to work on this anyway & 2. well it's not your budget plate, this thing is ~2 mm thick and SOLID . . . I don't want to ruin it . . . not sure how I would do that in the first place as I don't have a mold to bend it against, and then of course there is the finish . . . I'm not sure how it's done and there is a chance that it could 'flake off' . . . again I'm sure there is a technical term . . . when bending. 
SO

the 'solution' has already been started . . . and is visible below the plate . . . yep sanding . . . 

Wrap the plate ... carefully so you don't scratch it on the sandpaper (220 grit here) . . . I promise it's in there . . . somewhere . . . and rub over the jack hole area until the area is wide enough and the curve conforms to the plate . . . If I was really ambitious I would then recess it . . . . . . . . . . . . . 

Sunday, April 5, 2015

Thornback kite

I got the Thornback page up ... maybe not done but useful . . . if you're interested see under the "All things -> kites" on the right. If you have questions or suggestions let me know and I'll try to clear up any 'mistakes'.

A finished? neck

Here she is, one neck for the new guitar. Roasted maple, rosewood, 22 1650 frets, abalone face & side dots, three coats of OSMO polyx oil, Gotoh 381 height adjustable magnum lock cosmo black tuners and .... no nut .... well I'm told you can't have everything. So how did we get here.


All that was left to do was installing the tuners after applying the third coat of oil on Wednesday evening.
 So this is what will be going in

So the first order of business yesterday (well after cleaning some floors & the dining room table, doing some laps swimming, making sure the kids didn't drown while ... not drowning ... and putting some gas in the car) was to locate the holes for the tuner screws . . . small little buggers - make sure you don't loose them in the shuffle - one of the reasons I did this on the dining room table and not my messy work table.

Add blue painters tape to write on.

And assemble the tuners with their ferules finger tight . . . . then line them up & mark the holes

Which are just about visible here, and should be in a straight line - of course. They are, so I'm good, next step ... the ALL important punch the holes - ALWAYS punch the holes for accurate locations when drilling and accurate is definitively in order here, wouldn't want clown tuners would I ???? The approved method of course is to use a punch but ... ... ... DARN . . . I don't have one that small . . . . galvanized fence nail to the rescue (sorry no pics . . . I need to grow another arm first) . . . make sure the headstock is supported or . . . . once again I'm only responsible for my OWN stupidity ... anyone else's is their own business. 


Sorry for the crummy photo . . . screws seem 0.7 mm through the hole (yes I'm european so it's cm & mm for anything small . . . more divisions and less confusion make for more accuracy, easier calculations & thus less stupidity). The drill bit is a 1/16 which seems just a TAD large for these BUT then again they just need to be tight to prevent the tuners from rotating . . . no 'pull' strength needed . . . I'll drill the holes to 5 mm so the last 2 mm will provide some more 'hold'.


Drill bit chucked to 5 mm . . . check
Headstock taped off . . . check
Headstock clamped . . . check . . . do NOT attempt to do this without clamping the neck, at least have someone hold the neck, you DO NOT want this swinging around should the bit grab . . . you'll tear out the hole, break the bit off in the hole, hit something that shouldn't be hit ... and you really want to hold the drill with 2 hands to be as precise as you can be . . . . a $5 glue clamp is a must . . . . a drill press would be ideal but . . . once again I'm only responsible for my OWN stupidity ... anyone else's is their own business. 

You can see where I tore off the protective tape when drilling, fortunately nothing got damaged . . . 

Tape removed and test . . . . pfffff . . . . everything lines up as intended.


So screwing things down use the RIGHT size screw driver - do NOT even attempt with a normal #2 philips - the slots in these little buggers will strip. Put some soap or beeswax on the threads and they should go in with 2 fingers on the screw driver, if it takes more . . . back out, put on more soap / wax and try again, if it still doesn't go check the holes. Do NOT try to force it . . broken screws are ........ Anyway don't tighten the screws all the way . . . . 


Add the ferules to the face of the headstock to just before finger tight using your ........ fingers. Turn over, make sure the tuners are lined up and THEN tighten the screws, once again . . . . 2 fingers on the screwdriver, don't over tighten and strip the holes; you are not planning to hold an elephant in place with them . . . . then again maybe YOU are, what do I know.


Then tighten the ferules to the face of the headstock. I use a socket and my fingers, again do not over tighten, they are just tuners no need to torque it to .....

Oh and if anyone can explain the fascination with socket sets I'd be grateful . . . I just can't get it.

And we have a neck . . . . . well minus the nut anyway and the back may get another coat of the oil when I'm doing the body but for now it's done.

And here is a pic of the height adjustable posts . . . they are already staggered to begin with . . . no string trees needed . . . . or so the documentation claims . . . . we'll see

Here Is how it probably will look next to in relation to the body.