Well here is the basic plan for the benches to be made from a 1 x 6 x 3/4 plank. Any solid plank will do and while the Lowes hobby panels do fine for the seat the fact that they are laminated edge to edge makes them unsuitable for the legs without reinforcing them all the way down to the bottom as they will break at the lamination edges otherwise.
Tools:
Saw (a good hand saw will work fine, a jig saw is good, and a circular saw works but is limiting)
Drill w/ appropriate bits
Glue / C clamp(s) / T clamp
Square / Straight edge / measuring tape
Screwdriver
Wood burner - optional for decoration
Sanding block (one can be made from some of the waste)
Pencil & eraser
Materials:
6 x 1 x 3/4 (poplar / pine / hemlock . . . . )
#8 1-1/2" screws (10) - if you leave the screws in
#6 1-1/2" screws (10) & 3/8 dowel & wood glue - if you want to get rid of the screws
Paint, Danish Oil or Polyurethane
Sandpaper 80 / 120 / 220 grit (and 320 is nice, and 40 may come in handy)
Plan:

 Here is one that is built pretty much stock from the plan - the main difference is that the reinforcement is narrower. The material is billed as a 'Utility Shelf' at Lowes and this particular one was picked out of a stack of about 20 . . . it's finished in polyurethane (as are the others) and is nice and light. All connections here are both screwed and glued, the screws are for alignment, the glue for structural strength.
 This one has a storage shelf below the seat, the reinforcement is actually at the backside, you can just about see the bottom of it in the back at the middle of the storage shelf. The seat is made from a hobby panel but the legs, and shelf, are solid. Once again, screw and glue construction.
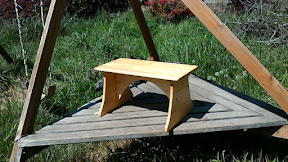 This IS a bench built from one of the Lowes hobby panels (contrary to my advice above) . . . note the reinforcement almost to the bottom of the legs to prevent the breaking on the lamination seams . . . a second bench made from a second piece with less reinforcement down the legs had both legs break at the bottom of the reinforcement. In this one the screws holding the seat were removed, the holes drilled out and then filled with dowel . . . this makes for a seat without any screw heads that can hang up on clothes.
Photo's of the build will have to wait a while as it seems that the first half of the series I've made last summer has disappeared . . . they are probably somewhere, I just can't seem to locate them right now.
No comments:
Post a Comment