Wednesday, April 29, 2015

The body . . . part 1 of . . .

Well with the last test it's time to do something for real . . . I can test till the crows come home but that won't get me a finished guitar . . .

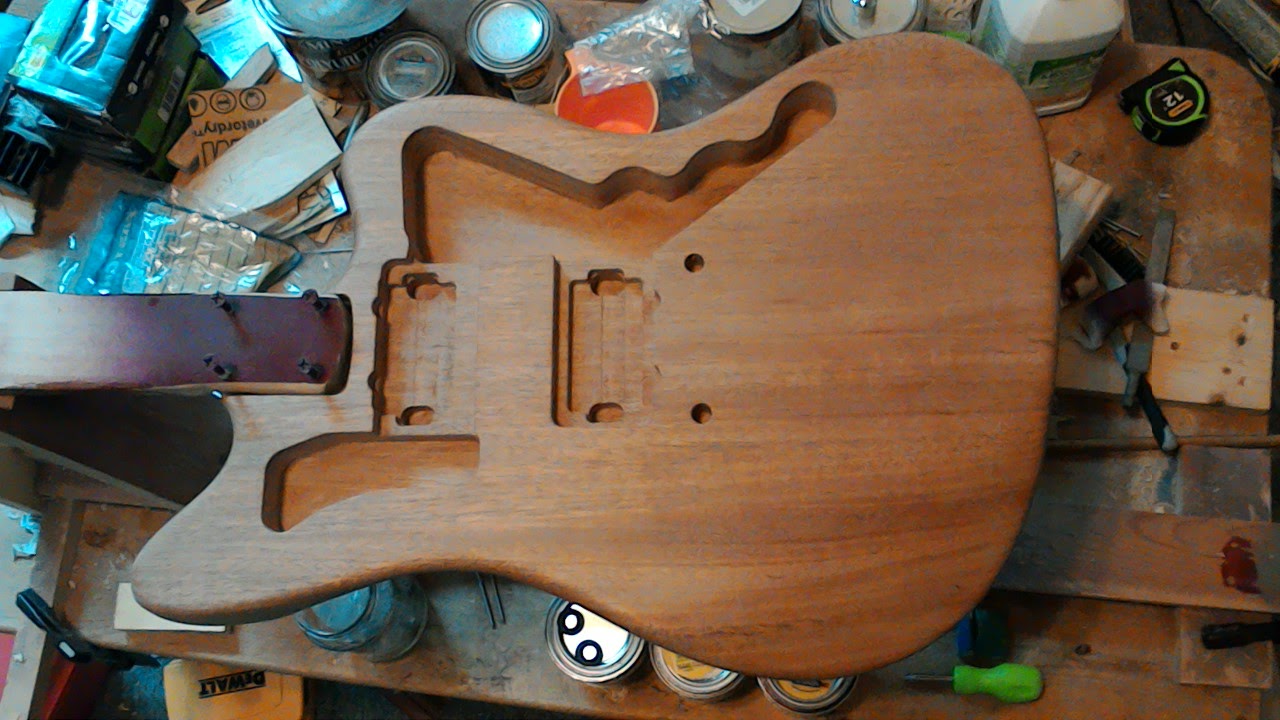
Step 1, light stain to bring out any remaining scratches . . . and sand down with 220 / 320 to remove those.
Bare wood . . . 
Applied the red mahogany minwax  oil stain with a piece of 'utility rag' from Lowes
And lightly stained . . . 
Well it'll be pretty once done . . . but there are as expected some scratches, quite a few light ones on the upper horn and some in the lower cutout round over and then at the lower back . . . 

Sanded these about an hour after the last picture was taken . . . and royally clogged the sandpaper . . . and evened out the stain after with a rag with some turpentine. Surprisingly the back was - as far as I could see - clean . . . no scratches. I'll let it all dry for 48 hr or so and then go over it again, lightly with some 220 and then some 320 to smooth everything down all the way . . . maybe another light application of stain and we (well I; I don't really expect anyone to come over and 'help') can put some finish on . . . 

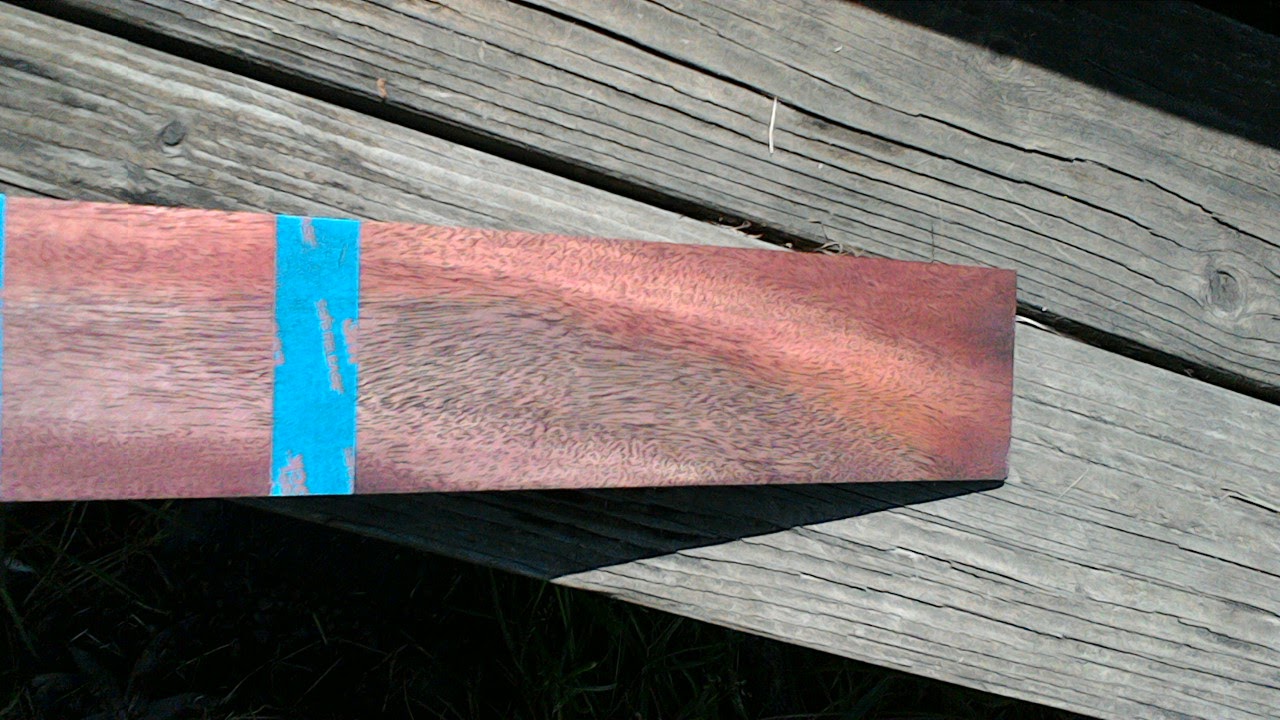
Thinking of doing a 'raised center' - a la a firebird using some leopard wood I've found at Rockler, need to see that in person first though . . . 
Leopard wood
Or maybe something else? . . . Mahogany $11 . . . Purple Heart $20, Padauk $13, Wenge $15 . . . hmm may be a 'problem' finishing that . . . Bolivian Rosewood (Pau Ferro) $16, Zebra Wood $15, Bubinga $12 . . . might look good . . . Jobillo $12 . . . but only 3" wide so I need 2 pieces possibly . . . striking though . . . 

The raised center will also reduce the - somewhat 'ugly' - 22 fret overhang at the end of the neck . . . there is a 1/4 gap there between the body and the fretboard there . . . 


Saturday, April 25, 2015

More ..... testing

The previous photos of the test strip for the stain turned out to red so here are some better ones:

At the top the red mahogany stain, at the bottom (from the end) 2 x Cabernet, 1 x Cabernet and Cabernet after red mahogany .... the pinkish tones are now visible in the 2 x Cabernet part ... not as pronounced as last week right after the staining but they are still there.

Friday, April 24, 2015

More Switches

Ok, so the last circuit had the 'hanging coil B' problem and a 3P4T switch that turns out to be kinda hard to find . . . Digikey  has one with a true common terminal configuration BUT it's a through hole PCB mount and not a panel mount solder lug style . . . possible but . . .

So here is the revised circuit using a 3P4T rotary which is common and easy to obtain . . . AND . . . it solves the 'hanging coil B when coil A is selected' problem, which in turn implies that the same is possible with some work for the 3P3T / 3P4T slide switches configuration.

May use this in the guitar . . . . 

Thursday, April 23, 2015

A gift . . . . because I was bored

Well I wondered if it was possible to use one switch for coil selection and a second for the combination . . . . turns out is is possible with 2 3 pole switches, one 3 pole 3 throw for coil selection (A, both, B) and one 3 pole 4 throw for selecting the combination (serial, parallel, serial out of phase, parallel out of phase).

I haven't tested this but the connections 'work' I believe:

The only 'mistake' I have to solve is the fact that coil B hangs loose (is not grounded) when coil A is selected. The only 'fix I've found is to use a 4 pole 3 throw switch there instead and use that 4th pole solely to connect B to ground in the UP position.

Saturday, April 18, 2015

Testing . . . testing . . . testing . . .

I knew I will stain the body before putting on a finish and some of the photos already show a test strip of mahogany.

So I've tried 3 wood stains (so far):
- Minwax, Red Mahogany
- Minwax, Red oak
- Rustoleum, Cabernet
Yes the object was to bring the red out in the Mahogany of the body.

I started with the Minwax stains. The red oak was discarded after the first tests . . . and I didn't bother to take a picture (sorry) . . . I really don't know why it's called RED oak, the color on the mahogany was brown with some 'grey' tones, not much red there, maybe it shows different when it's actually on oak or maybe pine . . . haven't tried that yet . . . hmmmmm, I've got some pine laying around somewhere I think . . .

Here is the red mahogany on a piece of mahogany next to the finished headstock, I agree it's not the best lighting for the picture, but this has the same brown as the 'red oak' but none of the grey.


Below is the same piece with some unstained mahogany showing on both sides of the test stain next to the neck. This was finished with the OSMO oil.

So I thought that I wanted some more red which is why I got a can of the Rustoleum Cabernet.

Which turned out to be interesting . . . if not exactly what I was after . . .
Here are two pictures of the cabernet color test, the end has 2 'coats' the next section 1 'coat' and the third from the end was fist stained with the red mahogany and then with the cabernet. The final section in the right photo has a single 'coat' of the red mahogany. Now these seem to show a bit redder than the actual color and not quite what I was after . . . in the right picture in 'real' life some of the tones are 'purple' rather than red especially in the section with a single 'coat' but they are definitively still there after 2 'coats' . . . however . . . they ONLY show pink/purple under certain angles and lighting conditions, not what I'm after but very interesting never the less . . . I don't know if the same would happen on a piece that was grain filled prior to staining as it would have much less (if any) surface texture (I'm NOT going to fill the grain on the body as I like the 3D effect of different 'colors' / 'tones' when turning the piece) but it would make for an interesting conversation piece . . . . . .

Here is the red mahogany end of the test strip under similar lighting conditions as the cabernet. Again it shows a bit more red / orange than my eyes saw it an hour or so ago.

So at this point I'm 'stuck' with the red mahogany stain as the best option. There is a cayenne stain in ??? - sorry can't remember the brand - but this is a stain / poly wipe-on single step finish and at this point I think I want to go with the OSMO oil for the body as well . . .  maybe I can use some red dye on the body prior to the minwax red mahogany . . . . still debating that one and it WOULD add one more thing to screw up, doing a test strip IS slightly different from doing a whole body after all.

Something to sit on . . . . # II

I put up some pictures of the finished product as promised.

Thursday, April 16, 2015

Something to sit on . . . .

I put up a 'dummy' page for the benches (it's under the ALL THINGS on the right side), the basic plan is there and I'll add some photo's of the finished product soon ... and to which I will be adding some photographs illustrating the building of one (or more . . . the wife wants more . . . ) as soon as I get to them . . . the girls need a bed so that may happen first . . . IF . . . they manage to clean up their room so I can work on it . . .

Tuesday, April 14, 2015

If the jack doesn't fit

Well the jack plate didn't fit quite as it should as illustrated in the previous post . . . and . . . just putting it on the side didn't feel right in the end so I decided to recess it in one direction . . .

So on the left is the process in progress, the blue part above the sand 'paper' wrapped jack plate is multiple layers of painters tape to provide a guide. The sandpaper (starting with 80 and going to 320 grit) was wrapped around the jack plate so everything would end up nice and tight.

On the right is close to the finished product, the sharp edges at the left and right side left by the sanding are already rounded over using some 320 grit sandpaper.

So here is the final product . . . . I unfortunately DID put some scratches on the jackplate . . . nothing that some use wouldn't have done but . . . . next time I'll put some painterstape over the outside face before starting . . . impatience is the bane of my existence . . . . after ?? years I really should come to grips with it . . .
The sand 'paper' in the first picture is the flexiple 'plasticky' kind from Lowes . . . very nice to use around sharp corners . . .

A note about sanding: a nylon bristle brush is nice to clean out the dust from the sandpaper to keep it nice and fresh & effective, something borrowed from the copper/bronze brush used to clean out the filings from a rasp or file.

Wednesday, April 8, 2015

The jack . . . . . .

So with the neck 'finished' it's the body's turn . . . .

First 'issue': the jack plate.

From the specs on the Gotoh site I believed - we all know about that, right - that the jack plate I ordered was flat . . .

Uhm . . . that doesn't look flat to me . . . and . . .  that's of course not quite the curve of the body at the jack hole AND there is also this
It doesn't show well in ANY of the photographs I've taken - and I did try - but, it's just a BIT wider than the flat area between the body roundovers . . . can someone please tell me the technical term, I should know but the brain . . . not surprising as it's probably meant for a Tele which has the same body thickness but doesn't have the roundovers . . . 
I knew about the width, so why not use a smaller plate, well there is this 7/8" hole that needs to be covered and the next smaller size plate was 15/16" wide, I wasn't going to trust manufacturing tolerances quite THAT much (also it was football shaped which I don't particularly like). Oh and why not bend the plate to conform to the curve . . . 1. I'm going to need to work on this anyway & 2. well it's not your budget plate, this thing is ~2 mm thick and SOLID . . . I don't want to ruin it . . . not sure how I would do that in the first place as I don't have a mold to bend it against, and then of course there is the finish . . . I'm not sure how it's done and there is a chance that it could 'flake off' . . . again I'm sure there is a technical term . . . when bending. 
SO

the 'solution' has already been started . . . and is visible below the plate . . . yep sanding . . . 

Wrap the plate ... carefully so you don't scratch it on the sandpaper (220 grit here) . . . I promise it's in there . . . somewhere . . . and rub over the jack hole area until the area is wide enough and the curve conforms to the plate . . . If I was really ambitious I would then recess it . . . . . . . . . . . . . 

Sunday, April 5, 2015

Thornback kite

I got the Thornback page up ... maybe not done but useful . . . if you're interested see under the "All things -> kites" on the right. If you have questions or suggestions let me know and I'll try to clear up any 'mistakes'.

A finished? neck

Here she is, one neck for the new guitar. Roasted maple, rosewood, 22 1650 frets, abalone face & side dots, three coats of OSMO polyx oil, Gotoh 381 height adjustable magnum lock cosmo black tuners and .... no nut .... well I'm told you can't have everything. So how did we get here.


All that was left to do was installing the tuners after applying the third coat of oil on Wednesday evening.
 So this is what will be going in

So the first order of business yesterday (well after cleaning some floors & the dining room table, doing some laps swimming, making sure the kids didn't drown while ... not drowning ... and putting some gas in the car) was to locate the holes for the tuner screws . . . small little buggers - make sure you don't loose them in the shuffle - one of the reasons I did this on the dining room table and not my messy work table.

Add blue painters tape to write on.

And assemble the tuners with their ferules finger tight . . . . then line them up & mark the holes

Which are just about visible here, and should be in a straight line - of course. They are, so I'm good, next step ... the ALL important punch the holes - ALWAYS punch the holes for accurate locations when drilling and accurate is definitively in order here, wouldn't want clown tuners would I ???? The approved method of course is to use a punch but ... ... ... DARN . . . I don't have one that small . . . . galvanized fence nail to the rescue (sorry no pics . . . I need to grow another arm first) . . . make sure the headstock is supported or . . . . once again I'm only responsible for my OWN stupidity ... anyone else's is their own business. 


Sorry for the crummy photo . . . screws seem 0.7 mm through the hole (yes I'm european so it's cm & mm for anything small . . . more divisions and less confusion make for more accuracy, easier calculations & thus less stupidity). The drill bit is a 1/16 which seems just a TAD large for these BUT then again they just need to be tight to prevent the tuners from rotating . . . no 'pull' strength needed . . . I'll drill the holes to 5 mm so the last 2 mm will provide some more 'hold'.


Drill bit chucked to 5 mm . . . check
Headstock taped off . . . check
Headstock clamped . . . check . . . do NOT attempt to do this without clamping the neck, at least have someone hold the neck, you DO NOT want this swinging around should the bit grab . . . you'll tear out the hole, break the bit off in the hole, hit something that shouldn't be hit ... and you really want to hold the drill with 2 hands to be as precise as you can be . . . . a $5 glue clamp is a must . . . . a drill press would be ideal but . . . once again I'm only responsible for my OWN stupidity ... anyone else's is their own business. 

You can see where I tore off the protective tape when drilling, fortunately nothing got damaged . . . 

Tape removed and test . . . . pfffff . . . . everything lines up as intended.


So screwing things down use the RIGHT size screw driver - do NOT even attempt with a normal #2 philips - the slots in these little buggers will strip. Put some soap or beeswax on the threads and they should go in with 2 fingers on the screw driver, if it takes more . . . back out, put on more soap / wax and try again, if it still doesn't go check the holes. Do NOT try to force it . . broken screws are ........ Anyway don't tighten the screws all the way . . . . 


Add the ferules to the face of the headstock to just before finger tight using your ........ fingers. Turn over, make sure the tuners are lined up and THEN tighten the screws, once again . . . . 2 fingers on the screwdriver, don't over tighten and strip the holes; you are not planning to hold an elephant in place with them . . . . then again maybe YOU are, what do I know.


Then tighten the ferules to the face of the headstock. I use a socket and my fingers, again do not over tighten, they are just tuners no need to torque it to .....

Oh and if anyone can explain the fascination with socket sets I'd be grateful . . . I just can't get it.

And we have a neck . . . . . well minus the nut anyway and the back may get another coat of the oil when I'm doing the body but for now it's done.

And here is a pic of the height adjustable posts . . . they are already staggered to begin with . . . no string trees needed . . . . or so the documentation claims . . . . we'll see

Here Is how it probably will look next to in relation to the body.

Friday, April 3, 2015

THE neck - part deux


So here is the neck after it's third coat of the OSMO oil. The color hasn't changed any further that I noticed - indicating that the wood is now probably saturated - ... of course a direct side to side comparison is pretty much impossible.

The test strip below is a piece of mahogany (the same strip is below the neck) that started out almost the same as the body. The ends just have 3 coats of the oil, the middle was stained with minwax red mahogany stain first ... the right end was a test how well as strip of painters tape would do in making a straight edge ... OK it turns out.
When applying the first coat of oil part of the stain rubs off - this is after the first coat - ... the rubout of the second coat still had some ... the third rubout has almost none indicating the stain - and thus the wood - is now sealed. I think this is pretty much what I'll do with the body.

Wednesday, April 1, 2015

ANNOUNCEMENT:

Once I have a little spare time ... uhm when again . . . I'll put up 2 long posts. One details a 2 line Thornback stunt kite (see here http://www.ian.ourshack.org/kitemaking/plans/thornback.html)

The other our benches/tables/mutifunctional thingies we have in our living room.

Finishing a neck

Would you believe that BOTH of these pieces are maple?? The neck is roasted maple with 2 coats of the OSMO polyx oil - from the can in the picture - the piece on the left is regular maple, the top (above the two pencil lines) is uncoated but below the 2nd pencil line it has 3 coats of the OSMO oil. While the regular maple's color didn't change much with the application of the oil, the color of the roasted maple underwent quite a dramatic change. After the first coat it was a nice dark honey ... and after the second it's now more of a caramel (like lightly finished & aged mahogany) ... the tint got at least 2 to 4 shades darker and the grain - while already more prominent than in the test piece - just popped out .... quite pleased with these results. The oil was a recommendation of Seth at best guitar parts who made the neck.


The feel of the finish at this point compares very favorably to my current favorite finish on a neck (hard lacquer finished to 600 grit) and may turn out to be even better . . . after 2 coats it pretty much retains the feel of bare wood ... I like it a LOT.
                                                               

If you look at pictures before the application of the OSMO oil (top) you can see that the neck and body are almost the same tint ... after 2 coats of the oil (bottom) that is definitively NOT the case anymore. The difference is actually more prominent than in the photo . . . . The picture above is a better representation of the color.

Raw wood

Two coats of OSMO oil on the neck

NOTE TO SELF; if I ever use this in the future, test on a 'real' piece for color.

A note on the OSMO oil; When applied to the regular maple it has a 'tacky', maybe 'sticky', surface after it's been rubbed off until it's completely dry (even when it feels dry to the touch in still 'sticks'). On the roasted maple on the other hand it seems to soak in more (?) and after wiping it off it's very nice immediately, nothing 'tacky' there.

AND yes I still need to clean up that work table, it's a good thing you can't see the rest of the room.