Nope not some iron age tablets . . . . 2 oversized 'anvils' for leather working, the front is for stamping and the back can be used for cutting. Each is made from four 1/2 x 3.5" pieces of oak and a piece of 8 x 10" 1/16th mild steel ... and 4 machine screws.
Tuesday, December 4, 2018
Wednesday, November 28, 2018
Another day, another glue up . . . .
Last time it was the back, this time it's the front . . . cherry and figured maple
The finished product with some mineral spirits after flattening out the strip and 120 sanding . . . . .
And for good measure the back with mineral spirts . . . but unsanded, it has a bit of a bow and one of the cherry backsides is still rough cut so it needs to be flattened first. Debating wether to go 'old school' and trying a number 5 plane or finish my router jig first and use that for flattening . . . .
Any ideas yet ???
The finished product with some mineral spirits after flattening out the strip and 120 sanding . . . . .
Any ideas yet ???
Wednesday, November 21, 2018
Start of a new . . . . . . .
Ok so this is the start of something new . . . . and not so new . . . so maybe that's somewhat new . . . partly new . . .
So I don't own a jointer . . . nor do I space for one and I currently don't have a router setup for jointing so this is how I join non-dimensional wood to make a larger panels . . . and it generally works well . . . although it does definitively require test fitting and fine tuning on occasion to get the best results possible. And even then the seams are not always 'perfect', but you have to inspect to work pretty closely to see that.
Always check . . . even if you KNOW
And I did NOT have a piece of walnut quite long enough so it has a join as well . . . . this was made by cutting both pieces at a 45° angle, putting them together and recutting the join which makes both sides equal, checking and redoing if needed . If done carefully this does make for a perfect join and using a razor saw the amount of material removed if the fit is close but not prefect is minimal.
Planes have been a fairly recent addition to the workshop ... they save a LOT of sanding but I'm still learning how to fettle them . . . and yes this is were the expression 'in fine fettle' seems to come from. A good level is flat (to within 0.005 I think in this case) so it makes for a nice - if somewhat narrow - sanding beam.
So That's nice but not nearly wide enough so some cherry. I've had this (and the maple for the middle) laying around for a year+ so it's as dry and stable as it's going to get at this point I think. If you haven't tried a japanese style pull saw get and try one . . . it's worth it and you may sell your western style (push) saws after using one for a while . . .
24" clamps aren't cheap, but they do come in handy .. .. ..
. . . edit: Oops those are 36" . . . . .
And one 'finished' panel for the back, it still needs flattening on the inner side but it was 4 o'clock so it was time to clean up) . . . next time the front panel . . . the weather was nice here this last weekend so the door was open . . . Below the panel is a 2 x 4 ft board with cork being banded with hawthorne as a pin up board for our 'school room' (and it'll also cover a hole in the wall were a cadet wall heater used to be installed).
![]() |
| flattening edge |
![]() |
| Routing for parallel edge |
![]() |
| Checking for length |
![]() |
| Accent strips in place |
![]() |
| First glue up |
And I did NOT have a piece of walnut quite long enough so it has a join as well . . . . this was made by cutting both pieces at a 45° angle, putting them together and recutting the join which makes both sides equal, checking and redoing if needed . If done carefully this does make for a perfect join and using a razor saw the amount of material removed if the fit is close but not prefect is minimal.
![]() |
| REALLY leveling accent strips |
![]() |
| Leveling accent strips |
Planes have been a fairly recent addition to the workshop ... they save a LOT of sanding but I'm still learning how to fettle them . . . and yes this is were the expression 'in fine fettle' seems to come from. A good level is flat (to within 0.005 I think in this case) so it makes for a nice - if somewhat narrow - sanding beam.
![]() |
| Cutting some cherry to length |
So That's nice but not nearly wide enough so some cherry. I've had this (and the maple for the middle) laying around for a year+ so it's as dry and stable as it's going to get at this point I think. If you haven't tried a japanese style pull saw get and try one . . . it's worth it and you may sell your western style (push) saws after using one for a while . . .
![]() |
| Next glue up |
24" clamps aren't cheap, but they do come in handy .. .. ..
. . . edit: Oops those are 36" . . . . .
![]() |
| One (mostly) finished back laminate |
And one 'finished' panel for the back, it still needs flattening on the inner side but it was 4 o'clock so it was time to clean up) . . . next time the front panel . . . the weather was nice here this last weekend so the door was open . . . Below the panel is a 2 x 4 ft board with cork being banded with hawthorne as a pin up board for our 'school room' (and it'll also cover a hole in the wall were a cadet wall heater used to be installed).
Monday, April 9, 2018
(Micro) surgery on a headphone plug
So my favorite pair of earphones used to be a Klipsch S2 . . . until the plug developed an intermittent problem which was probably a partial break in the ground wire. I've had this sitting around for a while now WITH a new plug for replacement but just haven't ever gotten to it ... till now.
So fortunately the wires seem to be color coded so we can just cut the thing, figure out what's what at the plug end and then resolder the wires into the new plug . . . . the copper is PROBABLY the common ground with the red either the right or left ...
Wires ready to solder into the new plug, yes the copper DID turn out to be the common ground . . .
First one done . . .
All soldered up . . . I was smart and remembered to check diameters before starting soldering, so there are 4 layers of heat shrink tubing around the wire to fill the hole on the plug and for strain relief . . .
All done, I really enjoy these much more than the 'cheap' pairs I have been using . . . MUCH flatter response than almost all bass heavy cheap pairs I've been trying/using for a while now (some of them are really unusable for anything for bass heavy modern stuff . . . and that's just NOT my thing) . . . . unfortunately the pug is to big to fit through the opening in my phone case but I'll take that for the better listening experience.
Monday, March 26, 2018
And it's back together . . . .
Well . . . it's back together.
Body cavity lined with copper (in progress) . . . check
Wiring complete . . . check
Tune up, let it rest a bit and redo the action & intonation . . . working on it . . .
Ok it was a little more complicated than that . . .
. . . there was a faulty switch in the neck PU coil selection unit that took me a while to run down, though I learned a new trick soldering switches . . . or maybe relearned an old one.
. . . the original placement of the treble bleed prevented the guard from falling into the right place . . . and then when bent to a more 'convenient position' shorted out against the copper lining.
. . . when testing the resistance readings got really weird . . . due to a inversely wired tone pot . . . and then the volume pot behaved weird (see below).
. . . and then there is the switch in the tone circuit that behaves . . . not like it should . . . despite testing OK . . . 3 times . . . there seems to be some kind of 'non continuity' there that prevents the tone pot from correctly shunting signal to ground via the cap . . . which may be a wiring fault . . .
The coil selection (where I though I had a wiring fault) now works flawlessly; GOOD. The treble bypass is quite subtle but noticeable. However, my trim pot went missing so I'll have to redo that part once a replacement comes in; OK. And then there is the tone knob . . . I think I have another faulty switch there - despite the fact that it seemed to check correctly - as there is something weird going on, I get (almost?) no tone rolloff when I have it in the prevolume position, while it - occasionally - DOES work when in the postvolume position . . . SO . . . that's another thing to check out . . . . .
OH and this IS the LAST time I do anything this COMPLICATED . . . . . . . . . . . . the rewire took two solid days of work to complete . . . . . .
. . . and there is something WEIRD on the volume pot; if you measure resistance between the IN & OUT lugs of the volume pot when wired up the resistance goes from 0 to 480K (or so) when turning the wiper and then on the last 5% of the range or so DROPS almost instantly to almost 0 on one of my multimeters . . . . the pot itself is fine . . . I unwired and rewired it twice thinking I had damaged it in soldering the leads . . . it behaves as it should but there is something WEIRD going on in the circuit . . . I'll have to see if I can run down next time I get the guard off.
Tuesday, March 20, 2018
Stupid mistakes . . . and a redo of the wiring diagram ... again
AND . . . one more time
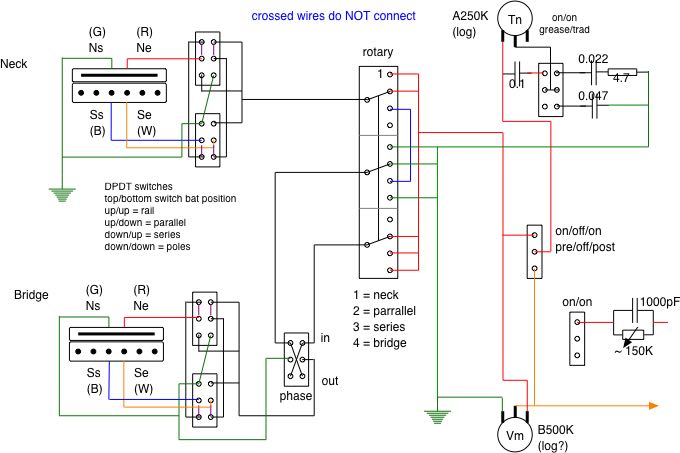
OK so I managed to do a number on myself with the last revision of the coil selection switches . . . it was WRONG (mea maxima culpa) so that's been corrected - thanks to another question about humbuckers and series switching, I should trust myself a little more . . . SD humbuckers connect red to white for series . . . and that just wasn't happening before. The tone stack has also been revised. The 'grease bucket' (tm) circuit has been removed as I couldn't figure out how to build it and a regular tone circuit on the switch ... I'll try that one again when I have some more time . . . AND . . . I wanted to try a treble bleed from the beginning so that's in there now with an on/off switch so I can see what and how much it does.
Making progress . . . . .
. . . . so far all the checks seem to come back as they should.
Tuesday, March 13, 2018
And ... another rewire . . . .
OK, after a while the neck pickup in the JM developed an annoying ... seemingly unreproducible problem . . . scratchiness . . . anyway it was painfull to listen to SO back to the diagram and trying to find WHERE I went wrong . . .
Well no faults leading to scratchiness were found . . . BUT . . . it look like the humbucker coils were wired out of phase . . . OUCH . . . start and end somehow got interchanged on the P90 part of the pRails.
EDIT / UPDATE: NO, no, NO . . . they were NOT . . . it's now been corrected in the next post
First shot is the coil switching circuit being built. The second has the coil switching circuit and the phase switch complete and the rotary pickup selector switch is being built. No cloth wire this time, it's not bad to work with but I didn't have enough for a complete rebuild and it's more bulky than the silicone insulated hookup wire.
Well no faults leading to scratchiness were found . . . BUT . . . it look like the humbucker coils were wired out of phase . . . OUCH . . . start and end somehow got interchanged on the P90 part of the pRails.
EDIT / UPDATE: NO, no, NO . . . they were NOT . . . it's now been corrected in the next post
OK so here is the new diagram . . . and apologies to anyone who tried it . . .
So I took the whole instrument apart and . . . well in the end I think that an non insulated ground wire in the pickup coil switching circuit occasionally could make contact with the hot signal from the neck pickup depending on the vibration and other factors . . . not solid contact mind you, but just kinda glancing off of it ... thus the scratchyness . . . ??? . . . that's the only thing I could find remotely problematic electrically . . . and of course . . . it's hard to see through a solid wood body or pickguard and things undoubtedly move on installation and . . . .
Also took the opportunity to rout out some 'tight spots' where the pickup legs were a 'tight' fit and to rout a shorter path from the bridge pickup to the coil switching circuit in the upper horn . . . and debating whether I want to coat the whole interior with copper shielding foil while I have it apart . . .
Anyway here are some shots of work in progress:
Volume & tone next week, I have to have a look at the tone circuit before I put that in (EDIT: done that and yes there was a mistake that has been corrected), the SPDT on/off/on switch should switch the tone circuit before or after the volume pot . . . just to try if it make a difference (quite possibly not), the other switch should give me a straight cap like a normal tone circuit OR a version of the Fender grease bucket circuit . . .
Subscribe to:
Posts (Atom)