
Thursday, May 23, 2019
Gimme some ... ... ... tone
Ok here is the first go at the circuit . . . I'm not sure I'm 'sold' on the greasebucket I have on the tone pot but I want to try it ...

Monday, May 20, 2019
FINISHED ... again?? ... ... ... well kinda
Ok, so it LOOKS finished . . . but it's not 'wired up' yet.
First the pickup controls need a place . . . cutting a blank to size, the finished blank (it's going to be just a rectangular slab for now, nice and easy) and enlarging the 1/8" pilot holes to 1/4" to fit the switches. I did this by hand as the plastic cut easily with the step bit.


And the finished product and a mockup with the switches installed


And then
 Reinstalling the bridge . . . and I just learned that Schaller 475 bridges come with 2 DIFFERENT intonation screw and spring lengths . . . did NOT know that before, and did not pay attention so were do they go . . . in the end I put the longies on E, A, G and the shorties on e, B, D.


The final version will have brass pickup rings - and possibly the witch 'holder', which may also revert to a 5 way super switch -, although I don't know yet if they will be polished up of brushed. But I want this in a playable condition as soon as possible as I have to build a shed.
First the pickup controls need a place . . . cutting a blank to size, the finished blank (it's going to be just a rectangular slab for now, nice and easy) and enlarging the 1/8" pilot holes to 1/4" to fit the switches. I did this by hand as the plastic cut easily with the step bit.


And the finished product and a mockup with the switches installed


Next up ... measuring the screw holes for the pickup rings, and installing the ground for the bridge.


And then

And here it is installed . . . with some of the details hat all the cutouts were for, the switches are a variation of the coils switching system for the pRails on my JM no applied to 2 different pickups, when wired up they will do Neck - both forward, Bridge - both back, Series - together, Parallel - apart. The little nubbin in the middle is a phase switch. The posts of the volume and tone knobs will be cut flush with the 'roller' knob and blackened with some black nail polish . . . and then I still need a plate for the back of the cavity . . .

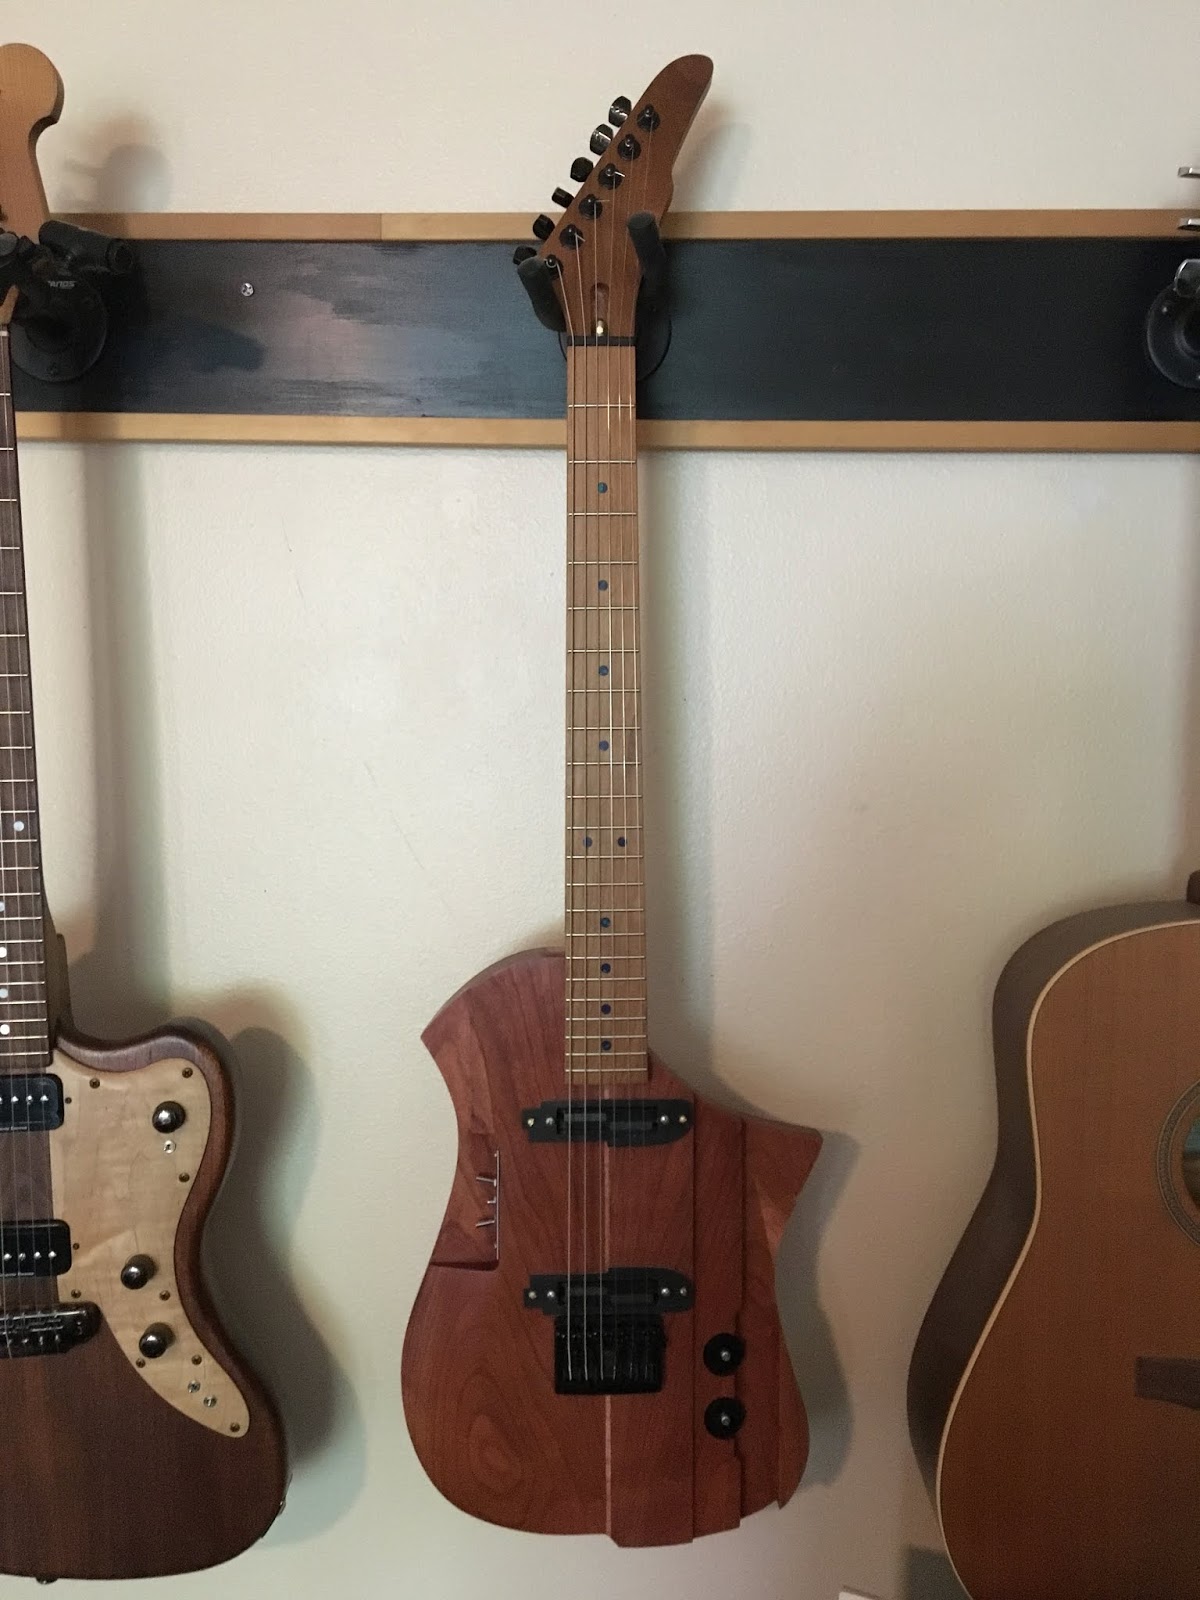

The final version will have brass pickup rings - and possibly the witch 'holder', which may also revert to a 5 way super switch -, although I don't know yet if they will be polished up of brushed. But I want this in a playable condition as soon as possible as I have to build a shed.
Friday, May 3, 2019
Running rings
So ...
this is were I left it . . . . it needs some contours as a rectangle is pretty boring.


And the final product, minus the holes for the mounting screws.


this is were I left it . . . . it needs some contours as a rectangle is pretty boring.

Note that this will not necessarily be the design I use for the brass but once again I want to try the same techniques I would use to shape the brass. The rectangular cuts were roughed in with a hacksaw and then refined with a file. The oval and round patterns on the other corners were directly filed in but with the brass I would again first rough them out to cut down on the time spent filing.


And the final product, minus the holes for the mounting screws.

Starting to think about the wiring as that's the next step . . . it sure looks like there may be a guitar circuit in there . . .

Friday, April 26, 2019
FINISHED
NO not that kind of finished . . . . . . . . . . . . . there is still plenty of work to come before THAT

So here she is after a couple of coats of red stain and some natural danish oil . . . . . . . . . the figured Maple strip on the front came out quite nice and the Cherry is beautiful - however - the regular maple on the back didn't take well to the stain (see the previous post) . . . it looks a bit of a mess so I may sand that out, it probably didn't penetrate very far, and just recoat with Danish oil . . . Then again, you rarely see that side anyway so I'm not sure if I'll put in the time.
I'll have to take the bridge off one more time as I . . . . DARN . . . . forgot to put the ground wire in.
And making some blanks for - temporary - pickup rings. I decided to make them from black/white/black pick guard material first to speed the process, it's a lot easier to work with than the brass they will eventually be (see the piece used for sizing the blanks). The material was cut with a fine tooth 'japanese' saw. I figured that if it cut wood it would cut the pick guard, and it did just fine.


Marking up the blank for the cutout, rough cut with a Dremel plastic cutoff blade and file and almost finished with sandpaper . . .


And the final product . . . the calipers say that the dimensions are within 0.3 mm of were they should be. Not exact but better than I have ever done so far, we'll have to see if this is a fluke or a reproducible result when with start cutting into the brass blanks.
Now I just have to mark up an outline and cut that and it can be put of the guitar . . . just a rectangular slab is a bit boring so I'll put another few hours into it so it'll be something I can live with until I get the brass ones done . . . which will likely be a bit as I won't have a lot of time to work on those once the puzzle pieces for the new shed arrive . . .
Friday, April 19, 2019
Attaching a neck and placing a bridge
Well we are coming to the end . . . .
First the neck screws needed to be a bit shortened as the body is only 1 1/2" thin . . . with a standard neck pocket depth that makes the screws poke through further so as to not get them through the neck the tips need to be cut off . . .
 So here they are screwed to depth through a piece of scrap plywood, and an cutting disk on the Dremel makes short work of the ends we don't need . . . I knew they were cut before as the heel they came out of was contoured but the apparent difference in the original length is puzzling . . .
 Next the holes in the body were drilled out to 3/16 using first a step bit ... to make sure the final hole was centered on the original 1/8 hole ... and then a regular 3/16 twist bit . . . why 3/16, glad you asked, that's the smallest size the necks screws just 'drop through' the body (5/32 was to small) so as to have no chance of a 'jacked' screw . . . a screw that actually holds in both pieces of wood but when put in pushed the 2nd piece away from the first and resulted in a gap between the pieces. With a standard neck plate there is NO need for the screws to have a 'hold' in the body wood so I make sure to 'eliminate' any chance of it.
And then we put the neck on . . . and can figure the placement of the bridge.
Oh and the moral of this pic . . . alway test your stain on ALL the wood you use . . . the cherry stained very nicely, the maple . . . not so much, I may want to sand that back.
Drilling the first hole for distance, the mark is just below the end of the dowel there that was originally used to locate the body halves after separations. The central screw was then used to locate the other two screws with a square using the centerline (I had already checked that the neck was pretty much dead on) and finally all three holes drilled.


 And the bridge is in place . . . ALWAYS . . . put some wax on your screws, it makes them go in so much easier and reduces (if not eliminates) the chance that you'll break one as long as you have a pilot hole that's at least close to the appropriate size.
 And then it was time to transplant the tuners. This thingy is a pin vise which holds a small bit (not sure how small I just sized it against the retaining screws for the tuners). While standard drill with a 3/8 chuck pretty much bottoms out at a 1/16 bit this thing can hold a 1/64 or possibly smaller bit . . . and because it's driven by hand you can even leave the tuners in place, and use their eyes to locate the holes right there. Once again, wax your screws before putting them in . . . if there is anything more annoying than a tuner retaining screw broken at the face of the wood in a guitar headstock I haven't discovered it yet.

And I use a 10 mm socket to finger tighten the nuts on the tuners . . . some tuners may need a deep socket but these were just fine with the standard one.

And here she is . . . all strung up for the first time (standard loose unmodified Tusq nut and all) . . . I'll need to shim the nut, clearance over the first fret of all the stings are fine - except - for the e which BARELY clears it and buzzes like a bee when plucked hard. Relief at the 12th fret is about 1 mm and somewhere around 1.5 - 2 mm at the 21st after tightening the truss rod so that's about right but the nut needs to be raised 1/2 - 3/4 mm or so to get enough clearance over the 1st fret. I'm thinking a 1/8" brass (or is it bronze what I have) shim and then sand down the bottom of the nut a little over 2 mm on the treble and about 3 mm on the bass side . . . I'll experiment with some copper tape first to see what raising the treble side will do.
Next up finishing . . . . and this point only the back has a layer of stain to see what it would do . . . not so great on the maple is the verdict I think, but I do like the color of the cherry after the stain so I think I'll keep that. Then we have the electronics, and the control covers, and the pickup rings. I have some black/white/black pick guard material that will be used first but the pickup rings will eventually be bronze (or is it brass), as will be the cover for the pickup selector switches and the truss rod cover.
First the neck screws needed to be a bit shortened as the body is only 1 1/2" thin . . . with a standard neck pocket depth that makes the screws poke through further so as to not get them through the neck the tips need to be cut off . . .
 So here they are screwed to depth through a piece of scrap plywood, and an cutting disk on the Dremel makes short work of the ends we don't need . . . I knew they were cut before as the heel they came out of was contoured but the apparent difference in the original length is puzzling . . .
And then we put the neck on . . . and can figure the placement of the bridge.
Oh and the moral of this pic . . . alway test your stain on ALL the wood you use . . . the cherry stained very nicely, the maple . . . not so much, I may want to sand that back.
Drilling the first hole for distance, the mark is just below the end of the dowel there that was originally used to locate the body halves after separations. The central screw was then used to locate the other two screws with a square using the centerline (I had already checked that the neck was pretty much dead on) and finally all three holes drilled.


And I use a 10 mm socket to finger tighten the nuts on the tuners . . . some tuners may need a deep socket but these were just fine with the standard one.

And here she is . . . all strung up for the first time (standard loose unmodified Tusq nut and all) . . . I'll need to shim the nut, clearance over the first fret of all the stings are fine - except - for the e which BARELY clears it and buzzes like a bee when plucked hard. Relief at the 12th fret is about 1 mm and somewhere around 1.5 - 2 mm at the 21st after tightening the truss rod so that's about right but the nut needs to be raised 1/2 - 3/4 mm or so to get enough clearance over the 1st fret. I'm thinking a 1/8" brass (or is it bronze what I have) shim and then sand down the bottom of the nut a little over 2 mm on the treble and about 3 mm on the bass side . . . I'll experiment with some copper tape first to see what raising the treble side will do.
Next up finishing . . . . and this point only the back has a layer of stain to see what it would do . . . not so great on the maple is the verdict I think, but I do like the color of the cherry after the stain so I think I'll keep that. Then we have the electronics, and the control covers, and the pickup rings. I have some black/white/black pick guard material that will be used first but the pickup rings will eventually be bronze (or is it brass), as will be the cover for the pickup selector switches and the truss rod cover.
Tuesday, April 16, 2019
Weighty matters
I played around with the new guitar some last night and thought the neck felt 'heavier' than on my other instruments so . . . .
tested the balance point: just behind the neck plate at this point, it'll move back into the body some more once the pickups and electronics are installed but with the pickups being single coil alumi tones they aren't all that heavy . . . the neck falls nicely into the hand when sitting though, and a little pressure of the right forearm fixes the instrument in place nicely . . . no strap buttons yet, but I don't think there will a tendency for neck dive as the balance point in already behind (if not by much) were the neck button will go.
tested weight: . . . holy mackerel . . . only ~ 5.5 lb for the whole instrument right now, that's less than just the body of my mahogany jazzmaster (let alone after installation of the pRails pickups) . . .
Monday, April 15, 2019
Last ... hopefully ... cuts on the body
So I REALLY want to finish this before the end of the month because we NEED to demolish our shed and rebuild a new bigger one which obviously includes quite a bit of work . . . including moving quite a bit of earth to level the bigger site . . . and cutting off some lower tree limbs so it'll fit . . . and demolishing the old chicken run (which hasn't been used since we moved in) . . . which leads to => we really should pull the old fence posts - - - - which are possibly set in concrete. So it's clear that when that all starts there will be little time for extended extra curricular activities.
With that in mind, I think these are the last cuts that define the body . . . .
First routing out the top part of the upper front bout to the 'lower' level'


This wasn't QUITE what I intended but a 'spur of the moment' thing . . . the original idea was to curve the lower step around with the outline and cut the upper step straight.
Next the step . . . drawing the curve using a ruler as a batten, not really recommended, but everything else I tried to use was either . . . not straight to begin with . . . or didn't bend quite easily enough. You sometimes just have to go with what works.


So I first free hand routed close to the line (<1 mm outside was considered 'good enough') and then I sanded in the rest of the curve . . . how ??? well you need a piece of sandpaper on something that bends smoothly with the curve . . . I first considered a piece of 1/8 lexan . . . no go, once again it doesn't bend easily enough . . . next sandpaper rolled around a large dowel . . . works but is slow due to the small contact area . . . piece of 1/16 aluminum would work ... probably ... but darn if I can find my large piece I KNOW I have ... somewhere. So in the end I sacrificed an old thin 6" ruler which was a little stiffer than I really wanted but . . . available . . . sandpaper affixed with some painters tape and super glue and away we go . . . 120, 220 ... 320 . . . and done.
Next one more hair raising operation, drilling the holes for the neck screws . . .
 Ok, so this is after measuring everything at LEAST 5 times and drilling the first 2 pilot holes with a 1/8" bit with a Dremel in a stand. I've said that I don't own a drill press before, that's not - strictly - true, I do have a stand for the Dremel and it comes in handy, but only fits small jobs and has limited reach but for some neck screw pilot holes it works . . .
The hair raising part was that the locations of the holes were taken off the neck, were they seem to be centered exactly ... as you would expect from - what is likely CNC - drilled holed from the factory. Also the neck pocket was formed using a StewMac neck pocket jig centered as exact as possible over that maple stripe in the middle ... .... ..... so . . . why do the front holes in the neck pocket seem to be ever so slightly out of true when lined up with a neck plate . . . I checked, rechecked, rerechecked, checked on the other side, carried measurements from one side to the other, rererechecked . . . and . . . it just is it seems, EVERYTHING checks out, the plate seems to sit correctly and evenly . . . BUT . . . the holes seem askew . . . in the end I drilled them and . . .
And I used some ebony Minwax penetrating stain on the upper step ... not sure if that will or will not eventually make a difference . . . or if it even makes it that far, it just may get sanded off before the 'real' finishing starts.
 Performed the ULTIMATE check, I attached the neck with some #6 wood screws (standard neck screws are #8 . . . more on that later) - slightly undersized for 1/8" holes, they don't -quite - drop through but don't have a lot of 'bite' either . . . AND . . . it all lines up . . . so I'm still at a loss as to WHY the holes look askew . . . they STILL do . . . but there is a guitar there . . . Oh and that headstock will eventually need some reshaping . . . haven't worked that out yet, partially because the top curve starts just slightly north of the last tuner hole which is 'too close' for my original idea, on the pictures at the Warmoth site it seemed that I would have more 'room' there.
With that in mind, I think these are the last cuts that define the body . . . .
First routing out the top part of the upper front bout to the 'lower' level'


This wasn't QUITE what I intended but a 'spur of the moment' thing . . . the original idea was to curve the lower step around with the outline and cut the upper step straight.
Next the step . . . drawing the curve using a ruler as a batten, not really recommended, but everything else I tried to use was either . . . not straight to begin with . . . or didn't bend quite easily enough. You sometimes just have to go with what works.


So I first free hand routed close to the line (<1 mm outside was considered 'good enough') and then I sanded in the rest of the curve . . . how ??? well you need a piece of sandpaper on something that bends smoothly with the curve . . . I first considered a piece of 1/8 lexan . . . no go, once again it doesn't bend easily enough . . . next sandpaper rolled around a large dowel . . . works but is slow due to the small contact area . . . piece of 1/16 aluminum would work ... probably ... but darn if I can find my large piece I KNOW I have ... somewhere. So in the end I sacrificed an old thin 6" ruler which was a little stiffer than I really wanted but . . . available . . . sandpaper affixed with some painters tape and super glue and away we go . . . 120, 220 ... 320 . . . and done.
Next one more hair raising operation, drilling the holes for the neck screws . . .

The hair raising part was that the locations of the holes were taken off the neck, were they seem to be centered exactly ... as you would expect from - what is likely CNC - drilled holed from the factory. Also the neck pocket was formed using a StewMac neck pocket jig centered as exact as possible over that maple stripe in the middle ... .... ..... so . . . why do the front holes in the neck pocket seem to be ever so slightly out of true when lined up with a neck plate . . . I checked, rechecked, rerechecked, checked on the other side, carried measurements from one side to the other, rererechecked . . . and . . . it just is it seems, EVERYTHING checks out, the plate seems to sit correctly and evenly . . . BUT . . . the holes seem askew . . . in the end I drilled them and . . .
And I used some ebony Minwax penetrating stain on the upper step ... not sure if that will or will not eventually make a difference . . . or if it even makes it that far, it just may get sanded off before the 'real' finishing starts.

Subscribe to:
Posts (Atom)