Tuesday, March 26, 2019

In control . . . somewhat

Well LIFE got in the way again . . . so progress has been somewhat slow . . . BUT . . .

First we got the jack . . . and that's were it needs to go . . . and checking for angle


So I don't have any pictures from actually drilling the hole . . . first I drilled a 7/8 hole using a fostner bit in my hand drill about 1/8 - 3/16 deep as a countersink
and then tried a 3/8 fostner in my hand drill to do the rest but that was slow going so I switched to a 3/8 spade bit to drill through to the control cavity. This is the final result with the electrocup nice and countersunk.
The end were it went into the cavity needed some work to enlarge it so the female jack would fit but some careful work with a rotary rasp and 220 grit sandpaper took care of that . . . sorry no pics here.

Next up the cut outs for the volume & tone controls. If I had a drillpress I would have used that with a Fostner bit but . . . yep . . . don't have one, so this called for a template and some router work . . . 


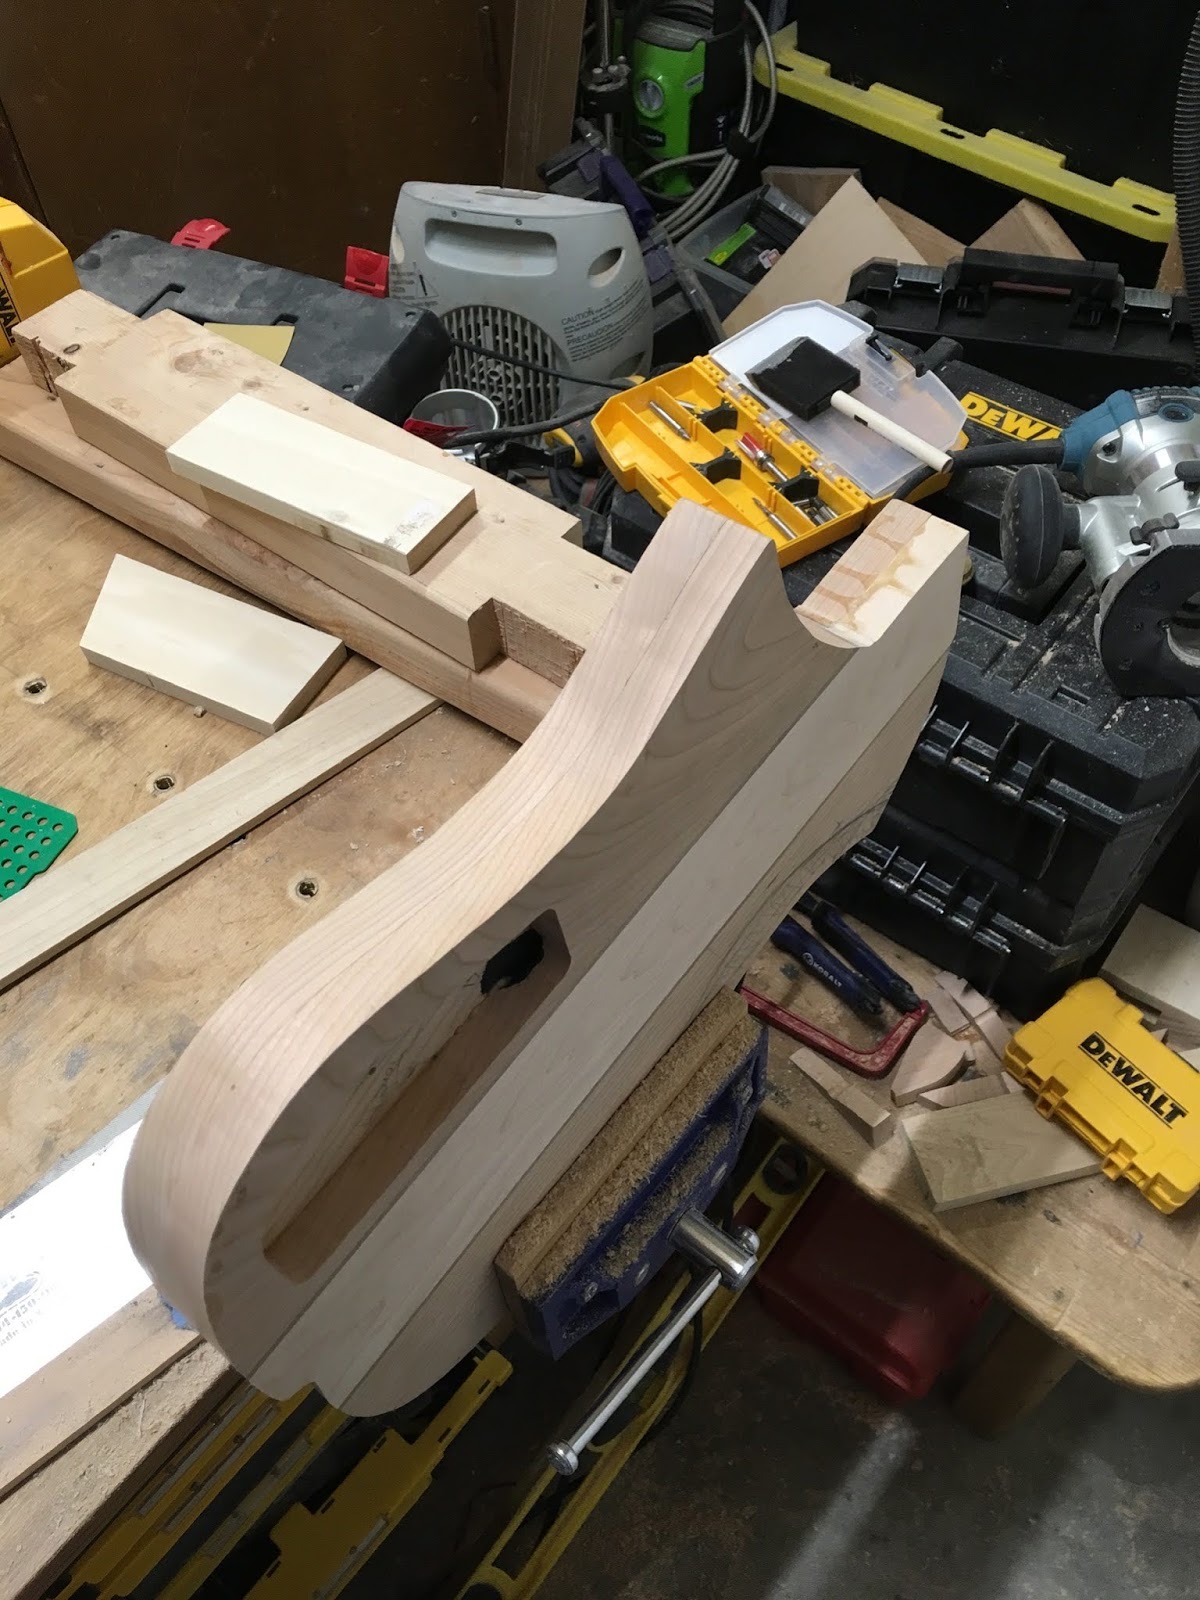
Some careful measuring, routing and work with a 1" spade bit later we have a template that fits perfectly in the cutout were the control cutouts need to go . . . and some work with a top bearing router bit later we have the cutouts for the controls. And as you can see I annotated the template after the fact. This last photo also shows the 'headache' I've put off dealing with, a rather large tearout at the back of the lower front bout. Still wondering what I'll do to fix it . . . which is on the 'menu' for next weekend . . . together with the removal of some material from the top front bout . . .
And finishing up on this . . . . the relief on the treble side of the neck pocket

And then there was THIS

Two pieces of 3/4" plywood laminated and banded on the long sides to form a base for my wife's lathe . . . for now it can be clamped to my work table or the old picknick table in the back but eventually it'll get the rest of a stand attached.


Friday, March 1, 2019

Coutours

So it's been a while . . . life sometimes has to happen too . . .

The next step is to rout the major contours into the body . . . the treble side first . . .


You can nicely see the difference in color between cherry that has been exposed for a while and freshly cut surfaces which are MUCH pales . . . unfortunately the IS some tearout along the backside of the 'horn' - such as it is - The options are to round over the edge, defeating the right angles of the design, cut a piece of closely grain matched cherry (I looked for the chip but was unable to find it) or I may inlay some quilted maple . . . we'll see later . . . maybe thin out that whole area one step further still (NOPE that IS NOT going to work, just checked and there's a relief cut in the back there, see the previous post) . . . have to check if I hollowed out the back there though. The middle picture shows were things went wrong when cutting away the 'waste' from the face of the 'waist'. I know what NOT to do the next time.

Next cutting the 'reveal' for the pickup switch control cavity.


It's actually 1/32 or so deeper than it should be ... one again live an learn, next time I'll drill a 1/4 hole into the cavity once I'm within an 3/16 or so so I can check the exact placing for the last router cut. This time I just advanced bu 1/16's or so and that didn't quite work out the way I thought.
And the mailman came by delivering the brass for the pickup rings and the control cavity cover . . . I don't remember ordering quite this many of the blanks for covers, but then again I'm bound to screw up at least one and now have plenty of spares. BTW brass is A LOT more work to cut that aluminum.

And then, the arm relief carve ....


Once more a bit of an experiment, a rotary rasp on my drill . . . I think I like the carving blade on my angle grinder better, it removes wood faster with more control, but this also works and makes slightly less of a mess. Ofter the removal of most of the waste it was back to a hand rast and file -once again notice the contrast between the fresh cut and the longer exposed wood - I'm still not entirely happy with this, I think the edge should meet the edge of the control rout but I didn't want to go 'too far' here.

And finally for some belly relief . . . not as extreme as the first one but it feels quite nice.


Sunday, January 20, 2019

Marrying a body . . .

So first I needed to finish cutting the cavity for the controls in the back. The procedure was basically the same as before although I free handed the curve along the outer edge of the guitar . . . thought that making a template was too much work and with a sharp bit and careful thin passes that turned out to be true . . . it wasn't completely smooth but some sandpaper takes care of that . . . and it's the inside.


 Next, well the cable run from the rear pickup to the control cavity (painted with shielding paint here . . . and the hole for the bridge ground . . . Done, ready for the ceremony.

And it pratically impossible to have enough clamps. The boards put pressure on the middle of the glue up . . . important to keep everything flat . . . 


So while waiting for the glue to dry I tackled another project that had been kicking around for quite some time. My JM has staggered Gotoh HAMP tuners . . . advertising says that they don't need string trees . . . advertising may be right in some cases but that group doesn't include mine. Since I got them installed they look good & function well . . . BUT . . . the D string has been twanging behind the nut pretty much since I got the nut set up. Now I COULD just take a couple of winds around the post tho bring the break angle up but that kinda defeats the purpose of locking tuners. Thus back to string trees, the 'problem' is that the hardware is Cosmo Black (aka black chrome) ... try finding some roller string trees in that (hint Gotoh doesn't make any, and what they do make does not roll, though it's OK probably. Finally find some chinese ones that looked likely on ebay . . . and once they arrived they have been kicking around in my box for ....


So her they are ... AFTER ... some judicious use of a file on the left example . . . if I want to stagger them and have the same break angle on all 4 strings and have the stings exit parallel to the headstock to the tuners some modifications were needed.

And here they are installed, looks good (even if the screws are still flat black (and half a size to small). More important, the twang seems to be GONE.


After that it was time for operation drip control . . . the starting situation on the left . . . and mostly cleaned up on the right. For the eagle eyed, the glue up was indeed not perfect there is a slight glue line indicating that I need to do a better job flattening the parts before putting them together , , , I may but a 1/8 (or 1/16) wood binding there to hide the boo boo if everything else works out fine . . . I 'll just need to do a better job next time . . . 

Monday, January 7, 2019

And some more holes . . . .


So here the middle of the bridge pickup cutout in the top has been hogged out with a jigsaw (drilled 3/8" hole in the middle and cut about 1/16" inside the edge lines), the blue tape is on the edge lines. Next 1/2" poplar boards were glued around the edge using super glue and the painters tape trick (search YouTube if you don't know that one yet) and finally a 1/2" pattern bit with a top bearing was used to refine the edge . . . easy. Not quite as fast as with a dedicated pattern and not suitable for complex shapes but for the occasional rectangular cutout it works perfectly.


And both pickup holes are done . . . next the cavity for the controls, I either have to cut it now (and have to route to EXACTLY the edge after front and back are glued up OR have to cut in from the edge later . . . not even sure if that would be possible as you would need a really long motising bit OR a really large groove cutting bit and even then quite a bit of chiseling would be required through a small opening with a 1/16" thick piece of wood on one side . . . I don't have either of those bits (if the first even exists) and I'm not that good with chisel so I'll cut it now . . . 


You can see the channel for the wires cut with a bowl bit in the first photo - and some cutting were the controls will go . . . got stupid again and tried to ease the bit in with a fixed base . . . no, no , NO of course the bit grabbed and, no permanent damage to either the work piece or my fingers but I SHOULD have know better and not even tried . . . dumb, dumb, DUMB. So I assembled the router in the plunge base, as I should have done in the first place, and cut the channel. The outside edge for the cavity MUST be in EXACTLY the right place otherwise the cavity will not be deep enough OR it won't be open on side to accept the controls thus measure, measure, check & measure again so you KNOW it's right . . . here the tape (and 'template') is actually 2 mm OUTSIDE the lines to be cut as I'm using a pattern insert with a 1/4" spiral bit . . . a bit of an experiment as I came across these bits at Harbor Freight, 3 for ... $9? I think ... only HSS not carbide but . . . we'll see . . . and measure, check, check and measure for final depth. It won't do to go through the top after all this work . . . I tried to take light passes but . . . there's always a but . . . lets leave it at that, it didn't go as expected but in the end no permanent damage was done beyond uttering some words that shouldn't be repeated in polite company. No fault of the bit though, I wouldn't want to use it for heavy work, one deeper pass had a LOT of burn but go easy and it does the job . . . 

Oh and I need to check that template guide, the bit was off by about 0.3-0.5 mm not sure if it's the template guide [also from Harbour Freight - but it seems correct], the template base [from MLCS - unlikely to be wrong] OR the plunge assembly [factory set up from Makita, the likely offender at this point] EVERYTHING fits tightly together yet, one side is further from center than the other; it doen't matter much here as long as I KNOW about it but for accurate work this needs to be corrected.


Final depth confirmed with the depth gage to be 15.76 mm I was shooting for 15.50 . . . the wood is 18 mm thick and I wanted a minimum of 2 mm (~ 3/32") over the top and a 13-14 mm opening (a lever switch requires about 13 mm to put in while regular miniswitches are between 10 and 12.5 mm) so I got what I wanted. Painted both top and bottom with shielding paint (something else that would be a chore once things are assembled . . .  and the cavity for volume & tone pots has also been started . .

Now to decide what else to cut out from bottom and top to make it as light as possible . . . and then we can marry them . . .

Monday, December 31, 2018

Salvador update

Well chrismas has come and gone so I had some time for more work . . . .

First the front and back needed to be flattened as (especially the front) was NOT flat at all, in fact there was an area that wasn't even planed you can see that on the left were the router hasn't even touched the strip just left of center . . . the middle photo was after the first pass . . . and the right shows the dado clearing bit I use for surfacing, it just skims the surface on each pass . . .


After the trip through the router the surface was still rough so the plane comes out (this is the back BTW) very light diagonal passes in BOTH directions smooths things quite nicely


And a flat surface after some sweat and elbow grease . . . the back is flat and smooth.

I position front & back and drill some 1/4" holes for dowels to positively position front and back in relation to each other after each separation as I have to make a cutout for the pickup selection lever switch that won't go through the front as well as the cable runs . . . and they will also positively fix the location of the template during routing of the outline . . .
And then we cut (most of the waste) . . . a jigsaw scroll blade died for this . . . fortunately the (cheap) jig saw lived.


So it looks like ... a Salvador guitar body . . . good it would be a problem if it looked like a ... well anything else really . . . .


And then we work on the template . . .  pencil, ruler, jigsaw, 80 grit sandpaper, knife . . . Tip: cut any lines with the knife before using the jigsaw that will prevent tearout.


All cleaned up (on the left) and mostley marked up (on the right). I put the critical items directly on the template, then drill 1/8" holes and use those to transfer critical points directly onto the body, with the indexing through the 1/4" dowels the template is in the same position EVERY time . . .

Next up rout the body to final shape. I used the template draw the shape on each part, and then a second pass with the jigsaw about 2 mm outside of the line. Next I used the template to rout the top and then the top as the template to rout the bottom . . . worked like a charm, only one little bit of tear out when I went a little tooooo fast and to deep . . . light passes make much better sides - live and learn. Note the multiple lines to find center on the back . . . due to it's shape it was hard to use the actual center line so lines parallel to the center were used to minimize measurement/drawing error, the front is a straing edge 90° to the center line so noooo issues there.

And Here is the current state of affairs in the process of being marked up for pickup cavities, switch/control routs, cable runs, weight relief and belly & elbow contours .

Tuesday, December 4, 2018

What's this?


Nope not some iron age tablets . . . . 2 oversized 'anvils' for leather working, the front is for stamping and the back can be used for cutting. Each is made from four 1/2 x 3.5" pieces of oak and a piece of 8 x 10" 1/16th mild steel ... and 4 machine screws.


Wednesday, November 28, 2018

Another day, another glue up . . . .

 Last time it was the back, this time it's the front . . . cherry and figured maple


 The finished product with some mineral spirits after flattening out the strip and 120 sanding . . . . .


And for good measure the back with mineral spirts . . . but unsanded, it has a bit of a bow and one of the cherry backsides is still rough cut so it needs to be flattened first. Debating wether to go 'old school' and trying a number 5 plane or finish my router jig first and use that for flattening . . . .


Any ideas yet ???